Panes management
From Opera Wiki
Monica.Sanna (Talk | contribs) (→Structure with wedge glazing) |
Monica.Sanna (Talk | contribs) (→Related items) |
||
| (49 intermediate revisions not shown) | |||
| Line 16: | Line 16: | ||
*'''Type''' [[File:tastomenutendina.png]]:Shows the type of filling that you want to assign to the typology, it can be Filling or Slat. | *'''Type''' [[File:tastomenutendina.png]]:Shows the type of filling that you want to assign to the typology, it can be Filling or Slat. | ||
| - | *''' | + | *'''Pane'''[[File:tastoc.png]] : It is the filling (glass or panel) or slat code. |
| - | *''' | + | *'''Glb. gasket''' [[File:tastoc.png]]: allows to enter glass perimeter accessories. |
*'''Sealant''': allows to enter the sealant for the glass. | *'''Sealant''': allows to enter the sealant for the glass. | ||
*'''Autom''': if selected, it makes the gap between the filling and the frame automatic and unchangeable. | *'''Autom''': if selected, it makes the gap between the filling and the frame automatic and unchangeable. | ||
| - | *''' | + | *'''head, left, right, sill''' [[File:tastoc.png]]: These are the gap values between the filling and the frame. |
| - | *''' | + | *'''Shims''' [[File:tastoc.png]]: Allows you to choose the thicknesses to put on the perimeter of the filling and in which amount. |
| + | *'''Supports''' [[File:tastoc.png]]: Allows you to choose which supports to place on the filling and in which amount. | ||
{{BR}} | {{BR}} | ||
[[File:posizionespessoreriempimento.png|500px|thumb|right]] | [[File:posizionespessoreriempimento.png|500px|thumb|right]] | ||
| Line 28: | Line 29: | ||
*'''Muntin''' [[File:tastoc.png]]: through this button you can open [[Muntins|muntin archive]] where you can choose the muntin to enter. | *'''Muntin''' [[File:tastoc.png]]: through this button you can open [[Muntins|muntin archive]] where you can choose the muntin to enter. | ||
*'''Vein''' [[File:tastoc.png]]: Set the direction of the filling vein. | *'''Vein''' [[File:tastoc.png]]: Set the direction of the filling vein. | ||
| - | *''' | + | *'''Pane color'''[[File:tastomenutendina.png]]: Allows you to match a color to the filling. |
| - | *'''Gasket | + | *'''Gasket color'''[[File:tastomenutendina.png]]:Allows you to match a color to the gaskets. |
*'''Notes''':this field allows you to match a note to the filling that shows up on the typology in the Design Sheet. | *'''Notes''':this field allows you to match a note to the filling that shows up on the typology in the Design Sheet. | ||
*'''Hide''': if active, it hides the note in the typology on the Design sheet. | *'''Hide''': if active, it hides the note in the typology on the Design sheet. | ||
| Line 41: | Line 42: | ||
*'''Type''' [[File:tastomenutendina.png]]: It shows the filling type that you want to assign to the typology, it can be Filling or Slat. | *'''Type''' [[File:tastomenutendina.png]]: It shows the filling type that you want to assign to the typology, it can be Filling or Slat. | ||
| - | *''' | + | *'''Ext. gasket''' [[File:tastoc.png]]: It is the gasket to be placed on the external part of the glass. |
| - | *''' | + | *'''Pane''' [[File:tastoc.png]]:It is the code of the filling (glass or panel) or of the slat. |
| - | *''' | + | *'''Int. gasket'''[File:tastoc.png]]: It is the gasket to be placed on the internal part of the glass. |
*'''Glazing bead'''[[File:tastoc.png]]: It is the code for the glazing bead profile. | *'''Glazing bead'''[[File:tastoc.png]]: It is the code for the glazing bead profile. | ||
| - | *''' | + | *'''Glb gasket'''[[File:tastoc.png]]: Allows you to enter glass perimeter accessories. |
| - | *''' | + | *'''Glb corner ( glazing bead angle)'''[[File:tastoc.png]]: It is the accessory that serves to close the corners of the glazing beads, normally rounded ones. The quantity is automatically multiplied by as many angles as exist in the structure to which the fill is matched. |
{{NB| | {{NB| | ||
This accessory can be entered automatically whenever you enter a glass bead that needs an angle. To get this automatism, it is necessary to assign the corner accessory to each glazing bead that requires it. This should be done in the profile archive in the profile's usual accessories “baggage” (see the section The profile's standard accessories archive, in the chapter [[Profiles]]}} | This accessory can be entered automatically whenever you enter a glass bead that needs an angle. To get this automatism, it is necessary to assign the corner accessory to each glazing bead that requires it. This should be done in the profile archive in the profile's usual accessories “baggage” (see the section The profile's standard accessories archive, in the chapter [[Profiles]]}} | ||
| - | *''' | + | *'''Glazing Bead type''' [[File:tastomenutendina.png]]: The function of this box is related to the Research panel, explained a little later, and it is used to indicate the aesthetic appearance of the glazing bead (sharp edge, rounded, gothic...). If you choose the type of glazing bead before starting the automatic search of components (glazing beads, gaskets...), the program will search for the most suitable glazing bead from those belonging to the indicated type. |
*'''Sealant''': Allows the insertion of glass sealant. | *'''Sealant''': Allows the insertion of glass sealant. | ||
*'''Autom''': if selected makes the gap between the filling and the frame automatic and unchangeable. | *'''Autom''': if selected makes the gap between the filling and the frame automatic and unchangeable. | ||
| - | *''' | + | *'''head, left, right, sill''' [[File:tastoc.png]]: These are the gap values between the filling and the frame. |
| - | *''' | + | *'''Shims''' [[File:tastoc.png]]: allows you to choose the thicknesses to place on the perimeter of the filling and in which amount. |
*'''Supports''' [[File:tastoc.png]]: Allows you to choose which supports to place on the filling and in which amount. | *'''Supports''' [[File:tastoc.png]]: Allows you to choose which supports to place on the filling and in which amount. | ||
{{BR}} | {{BR}} | ||
| Line 61: | Line 62: | ||
Both the choice of support and thickness activate the '''Quantity''' field. Also, for the thickness, it is possible to set the position in the frame that opens by selecting the button [[File:tastop.png]].}}. | Both the choice of support and thickness activate the '''Quantity''' field. Also, for the thickness, it is possible to set the position in the frame that opens by selecting the button [[File:tastop.png]].}}. | ||
*'''Muntin''' [[File:tastoc.png]]: witch this button you can open [[Muntins|muntin archive]], where you can choose the muntin to enter. | *'''Muntin''' [[File:tastoc.png]]: witch this button you can open [[Muntins|muntin archive]], where you can choose the muntin to enter. | ||
| - | *'''Vein'' [[File:tastoc.png]]: Set the direction of the filling vein | + | *'''Vein''' [[File:tastoc.png]]: Set the direction of the filling vein |
| - | *''' | + | *'''Pane Color'''[[File:tastomenutendina.png]]: Allows you to match a color to the filling. |
*'''Gasket col.'''[[File:tastomenutendina.png]]:Allows you to match a color to the gaskets. | *'''Gasket col.'''[[File:tastomenutendina.png]]:Allows you to match a color to the gaskets. | ||
*'''Notes''':this field allows you to match a note to the filling that shows up on the typology in the Design Sheet. | *'''Notes''':this field allows you to match a note to the filling that shows up on the typology in the Design Sheet. | ||
| Line 96: | Line 97: | ||
[[image:finestragestioneriempimenti3.png|The framework that is opened if the structure is of the wedge glazing type|500px|thumb|right]] | [[image:finestragestioneriempimenti3.png|The framework that is opened if the structure is of the wedge glazing type|500px|thumb|right]] | ||
| - | [[Image:vetroaspingere.png|thumb|The icon representing the present condition, i.e., glass profiles with wedge glazing type|left | + | [[Image:vetroaspingere.png|thumb|The icon representing the present condition, i.e., glass profiles with wedge glazing type|left]] |
*'''Type''' [[File:tastomenutendina.png]] It shows the type of filling that you want to assign to the typology, it can be Filling or Slat | *'''Type''' [[File:tastomenutendina.png]] It shows the type of filling that you want to assign to the typology, it can be Filling or Slat | ||
*'''Ext. Gasket''' [[File:tastoc.png]]:It is the gasket to be placed on the external part of the glass. | *'''Ext. Gasket''' [[File:tastoc.png]]:It is the gasket to be placed on the external part of the glass. | ||
| - | *''' | + | *'''Pane''' [[File:tastoc.png]]:It is the code of the filling (glass or panel) or of the slat. |
*'''Int. Gasket'''[[File:tastoc.png]]: It is the gasket to be placed on the inside part of the glass. | *'''Int. Gasket'''[[File:tastoc.png]]: It is the gasket to be placed on the inside part of the glass. | ||
| - | *''' | + | *'''Glb gasket'''[[File:tastoc.png]]: Allows you to insert glass perimeter accessories. |
*'''Sealant''':Allows you to insert glass sealant. | *'''Sealant''':Allows you to insert glass sealant. | ||
*'''Autom''': if selected makes the gap between the fill and the frame automatic and unchangeable. | *'''Autom''': if selected makes the gap between the fill and the frame automatic and unchangeable. | ||
| - | *''' | + | *'''head, left, right, sill''' [[File:tastoc.png]]:These are the gap values between the filling and the frame. |
| - | *''' | + | *'''Shims''' [[File:tastoc.png]]: Allows you to choose the thicknesses to put on the perimeter of the filling and in which amount. |
*'''Supports''' [[File:tastoc.png]]:Allows you to choose which supports to place on the filling and in which quantity. | *'''Supports''' [[File:tastoc.png]]:Allows you to choose which supports to place on the filling and in which quantity. | ||
{{BR}} | {{BR}} | ||
| Line 114: | Line 115: | ||
*'''Muntin''' [[File:tastoc.png]]: witch this button you can open [[Muntins|muntin archive]], where you can choose the muntin to enter. | *'''Muntin''' [[File:tastoc.png]]: witch this button you can open [[Muntins|muntin archive]], where you can choose the muntin to enter. | ||
*'''Vein''' [[File:tastoc.png]]: Set the direction of the filling vein | *'''Vein''' [[File:tastoc.png]]: Set the direction of the filling vein | ||
| - | *''' | + | *'''Pane color'''[[File:tastomenutendina.png]]: Allows you to match a color to the filling. |
| - | *''' | + | *'''Gaskets color'''[[File:tastomenutendina.png]]:Allows you to match a color to the gaskets. |
*'''Notes''':this field allows you to match a note to the filling that shows up on the typology in the Design Sheet. | *'''Notes''':this field allows you to match a note to the filling that shows up on the typology in the Design Sheet. | ||
*'''Hide''': if active, it hides the note in the typology on the Design sheet. | *'''Hide''': if active, it hides the note in the typology on the Design sheet. | ||
| Line 128: | Line 129: | ||
{{BR}} | {{BR}} | ||
| - | == Structure with | + | == Structure with marine glazing == |
| - | [[image: | + | [[image:finestragestioneriempimentivetroinfilare.png|The frame that is opened if the structure is with glass to be inserted |500px|thumb|right]] |
| - | [[Image: | + | [[Image:vetroainfilare.png|thumb|The icon representing the current condition, that is profiles with glass to be inserted|left]] |
| - | * | + | *'''Type''' [[File:tastomenutendina.png]] : This shows the type of filling that you want to assign to the type, it can be Filling or Slat. |
| - | * | + | *'''Ext. Gasket''' [[File:tastoc.png]]: This is the gasket to be placed on the outside of the glass. |
| - | + | *'''Pane''' [[File:tastoc.png]]: This is the code of the filling (glass or panel) or the slat. | |
| - | * | + | *'''int. and vinf. (inner gasket or glass to be inserted)''' [[File:tastoc.png]]: It is the seal to be placed in the inner part or it is the glass gasket to be inserted; if the latter is indicated, the outer one can not be indicated. |
| - | * | + | *'''Adapter''' [[File:tastoc.png]]: This is the code of the reducer used, if any. |
| - | * | + | *'''Glb. gasket''' [[File:tastoc.png]] Allows you to insert the glass perimeter accessories. |
| - | * | + | *'''Glb. corner (corner glazing bead)''' [[File:tastoc.png]]: This is the accessory that serves to close the corners of the reducer, normally rounded ones. The quantity is automatically multiplied by as many angles as exist in the structure to which the fill is matched. |
| - | {{NB| | + | {{NB|This accessory can be inserted automatically whenever you enter a reducer that needs angle. To obtain this automation, the angle accessory must be assigned to each gear unit that provides it. This operation must be done in the profiles archive in the ''baggage'' of usual accessories of the profile (see the section The archive of standard accessories of the profile, in the chapter [[Profiles]]}} |
| - | This accessory can be inserted automatically whenever you enter a reducer that needs angle. To obtain this automation, the angle accessory must be assigned to each gear unit that provides it. This operation must be done in the profiles archive in the | + | *'''Glazing bead type''' : field that is filled in by the program when the reducer is chosen. |
| - | * | + | *'''Sealant''':Allows you to insert the sealant for the glass. |
| - | * | + | *'''Autom''': if selected, it makes the gap between the fill and the frame automatic and unmodifiable. |
| - | * | + | *'''head, left, right, sill''' [[File:tastoc.png]]: These are the values of the gap between the fill and the frame. |
| - | * | + | *'''Shims''' [[File:tastoc.png]]: Allows you to choose the gauges to be placed on the perimeter of the filling-slat and in what quantities. |
| - | * | + | *'''Supports''' [[File:tastoc.png]] Allows you to choose the media to be placed on the fill and in what quantities. |
| - | * | + | |
{{BR}} | {{BR}} | ||
| - | [[File: | + | [[File:posizionespessoreriempimento.png|500px|thumb|right]] |
| - | {{NB| | + | {{NB|Both the choice of media and thickness activates the field '''Quantity'''. Also for the thickness it is possible to define the position in the frame that opens by selecting the button [[File:tastop.png]].}}. |
| - | + | *'''Muntin''' [[File:tastoc.png]]: Pressing this key opens the [[Muntins|muntin archive]], where you can choose the Muntins to insert. | |
| - | * | + | *'''Vein''' [[File:tastoc.png]]: Sets the direction of the filling vein |
| - | * | + | *'''Pane color''' [[File:tastomenutendina.png]]: Allows you to match a color with the filling. |
| - | * | + | *'''Gaskets color''' [[File:tastomenutendina.png]]: Allows you to match a color to the gaskets. |
| - | * | + | *'''Notes''': This field allows you to match a note with the fill that appears on the typology in the Design Sheet. |
| - | * | + | *'''Hide''': if enabled, hides the note in the type on the Design Sheet. |
| - | * | + | |
{{BR}} | {{BR}} | ||
| - | [[image: | + | [[image:riquadroriduttore.png|thumb|210px|right]] |
| - | * | + | *'''The Adapter framework''' |
This frame, in addition to showing the section design of the reducing profile, allows you to check joints, tolerance, data and set cuts. | This frame, in addition to showing the section design of the reducing profile, allows you to check joints, tolerance, data and set cuts. | ||
| - | *[File: | + | *[[File:tastotagliodiagonale.png]] sets the angles to 45°. |
| - | *[File: | + | *[[File:tastotagliosenzaangolo.png]] sets the profiles so that the tips lean against each other without forming an angle. |
| - | *[File: | + | *[[File:tastotolleranza.png]]: The operation of this button is linked to the activation of the buttons for setting the cut-off angles. In fact, if the key that adjusts the position of the profiles from tip to tip is active, the activation of the tolerance button will deduct the tolerance value entered in the technical data of the reducer, in the profiles archive, shortening all four reducers of the filling. |
| - | *[[File: | + | *[[File:tastodati3.png]]: Pressing this button opens the [[Glazing bead settings|glazing bead data setting]] to be able to vary, if necessary, some data of a single gearbox, useful in cases where the adaptors must be different from each other by code, cutting size or other. |
| - | [[File: | + | [[File:riquadroricerca.png|thumb|200px|right|The search frame]] |
| - | * | + | *'''Research framework''' |
This box allows you to start the automatic search for components (reducer, gaskets...) for the best sealing solution based on the glass set. | This box allows you to start the automatic search for components (reducer, gaskets...) for the best sealing solution based on the glass set. | ||
| - | *[File: | + | *[[File:tastimenopiu.png]] allows you to search for the finer and the larger inner seal, respectively. |
| - | *[[File: | + | *[[File:tastoauto.png]] allows you to automatically search for the best sealing solution (gaskets, reducer...) based on the glass set. |
| - | {{NB|For the correct action of this function, see the paragraph on glass with glazing bead. }} | + | {{NB|For the correct action of this function, see the paragraph on glass with glazing bead.}} |
| - | {{BR} | + | {{BR}} |
| + | ==Structure with stepped glass== | ||
| - | + | {{NB|These settings are valid only for ''double glazing'' type fillings''}} | |
| - | + | For all the structures described in the previous paragraphs, it is also possible to design a type with offset glass, in which the glass covers the frame. | |
| + | This solution allows to define parameters that calculate the amount of sheet surface needed to cover the frame. | ||
| - | + | Offset glass can be placed either inside or outside the structure. | |
| - | + | ||
| - | + | ||
| - | + | ||
| - | + | ||
| - | + | ||
| - | + | ||
| + | [[File:sfalsamentovetro.png|thumb|500px|right|The offset glass management panel]] | ||
| - | + | To access the '''Step Glass Offset''' panel, click the button [[image:tastooffsetvetro.png]]. In this panel you can enter the gap values for the offset glass pane. | |
| - | + | ||
| - | + | {{NB|Before entering this panel, enter in the fields described in the previous paragraphs,'''sup, sx, dx, inf,''' the gap values between the filling and the frame, which in the case of offset glass should indicate the maximum area to be covered by the glass.}} | |
| - | + | ||
| - | |||
| - | |||
| - | |||
| - | |||
{{BR}} | {{BR}} | ||
| - | [[File: | + | [[File:sfalsamentovetrointerno.png|thumb|500px|right]] |
| - | + | *If the offset glass sheet is the inner one, the offset to be entered is '''negative.''' | |
| - | + | ||
| - | |||
| - | |||
| - | |||
| - | |||
| - | |||
| - | |||
{{BR}} | {{BR}} | ||
| + | [[File:sfalsamentovetroesterno.png|thumb|500px|right]] | ||
| + | *If the offset glass sheet is the outer one, the offset to be entered is '''positive'''. | ||
| - | * | + | |
| + | {{BR}} | ||
| + | {{NB|For some examples of offset glass, see the chapter [[How to manage stepped glass]]}} | ||
| + | {{BR}} | ||
| + | |||
| + | |||
| + | |||
| + | == Structure with slatted pane == | ||
| + | |||
| + | [[Image:finestragestionedoga.png|thumb|500px|The frame that is opened if the structure is with a railing]] | ||
| + | |||
| + | |||
| + | *'''Type''' [[File:tastomenutendina.png]]: This shows the type of fill that you want to assign to the type, in this case Slat. | ||
| + | *'''Ext. Gasket''' [[File:tastoc.png]]: This is the seal to be placed on the outside of the glass. | ||
| + | *'''Slatted pane''' [[File:tastoc.png]]: This is the code of the slat. | ||
| + | *'''Int. Gasket''' [File:tastoc.png]]: This is the seal to be placed in the inner part of the glass. | ||
| + | *'''Glazing bead''' [[File:tastoc.png]]: This is the code of the profile of the glazing bead. | ||
| + | *'''Glb. gasket''' [[File:tastoc.png]]: Allows the insertion of glass perimeter accessories. | ||
| + | *'''Glb. corner (corner glazing bead)''' [[File:tastoc.png]]: This is the accessory that is used to close the meeting corners of glass-edges, normally rounded ones. The quantity is automatically multiplied by as many angles as exist in the structure to which the slat is matched. | ||
| + | |||
| + | |||
| + | {{NB|This accessory can be inserted automatically whenever you enter a glass-edge lock that requires angle. To achieve this automation, you must assign the angle accessory to each glazing bead that provides it. This operation must be done in profiles archive in the ''baggage'' of usual accessories of the profile (see the paragraph The archive of the standard accessories of the profile, in the chapter [[Profiles]]}} | ||
| + | |||
| + | *'''Glazing Bead type''' [[File:tastomenutendina.png]]: The function of this box is related to the Search box, explained a little later, and it serves to indicate the aesthetic appearance of the glazing bead (sharp edge, rounded, gothic...). If you choose the type of lock before starting the automatic search for components (lock, gaskets...), the program will search for the most suitable lock belonging to the type indicated. | ||
| + | *'''Sealant''' [[File:tastoc.png]]:Allows you to insert the sealant for the glass. | ||
| + | |||
| + | |||
| + | *'''Autom''': if selected, it makes the gap between the fill and the frame automatic and unmodifiable. | ||
| + | *'''head, left, ringht, sill''' [[File:tastoc.png]]: These are the values of the gap between the fill and the frame. | ||
| + | *'''Shims''' [[File:tastoc.png]]: Allows you to choose the gauges to be placed on the perimeter of the filling-slat and in what quantities. | ||
| + | *'''Supports''' [[File:tastoc.png]] Allows you to choose the media to be placed on the filling-slat and in what quantity. | ||
| + | {{BR}} | ||
| + | [[File:posizionespessoreriempimento.png|500px|thumb|right]] | ||
| + | {{NB|Both the choice of media and thickness activates the field '''Quantity'''. Also for the thickness it is possible to define the position in the frame that opens by selecting the button [[File:tastop.png]].}} | ||
| + | |||
| + | |||
| + | *'''Angle''' [[File:tastoc.png]]: field for entering the angle value of the slat | ||
| + | *'''First stave''' [[File:tastoc.png]]: field for the height of the first slat. | ||
| + | *'''Pane Color''' [[File:tastomenutendina.png]] Allows you to match a color with the filling-slat. | ||
| + | *'''Gasket color''' [[File:tastomenutendina.png]]: Allows you to match a color to the gaskets. | ||
| + | *'''Notes''': This field allows you to match a note with the fill that appears on the typology in the Design Sheet. | ||
| + | *'''Hide''': if enabled, hides the note in the type on the Design sheet. | ||
| + | {{BR}} | ||
| + | |||
| + | |||
| + | *'''Glazing bead framework''' | ||
The function of this frame is the same as in the previous paragraphs. Its display changes based on the Glazing bead System registered in the profile (with glazing bead, push, insert). | The function of this frame is the same as in the previous paragraphs. Its display changes based on the Glazing bead System registered in the profile (with glazing bead, push, insert). | ||
| - | [[File: | + | [[File:riquadroricerca.png|thumb|200px|right|The search pane]] |
| - | * | + | *'''Research Framework |
This frame allows you to start the automatic search of components (reducer, gaskets...) for the best sealing solution based on the glass set. | This frame allows you to start the automatic search of components (reducer, gaskets...) for the best sealing solution based on the glass set. | ||
| - | *[File: | + | *[File:tastomenopiu.png]] allows you to search for the finer and the larger inner seal, respectively. |
| - | *[[File: | + | *[[File:tastoauto.png]] allows you to automatically search for the best sealing solution (gaskets, reducer...) based on the glass set. |
| Line 251: | Line 281: | ||
| - | [[File: | + | [[File:slattedpanel.png|thumb|left|200px]] |
| - | + | '''Slatted framework''' | |
| Line 258: | Line 288: | ||
This section manages the accessories and also any machining, in the same way as the accessories of the other profiles are managed in the design sheet. | This section manages the accessories and also any machining, in the same way as the accessories of the other profiles are managed in the design sheet. | ||
| - | *The [[File: | + | *The [[File:tastoaccessoridoga.png]] button opens the management board for the [[Panel accessories|accessories]] that are matched to the slat. |
| - | *The [[File: | + | *The [[File:tastolavorazionidoga.png]] button opens the management board for the [[Panel machining|machinings]] associated with the slat. |
{{BR}} | {{BR}} | ||
| - | |||
| - | |||
| - | |||
== Related items == | == Related items == | ||
| - | *[[ | + | *[[MTM Management#Action keys|How to manage double pane]] |
| - | + | ||
| - | + | ||
| + | *[[How to manage stepped glass]] | ||
| Line 282: | Line 308: | ||
| - | |||
<!-- HELP: JM/W1090 --> | <!-- HELP: JM/W1090 --> | ||
[[Category:JM/Manual]] | [[Category:JM/Manual]] | ||
Latest revision as of 14:21, 6 February 2025
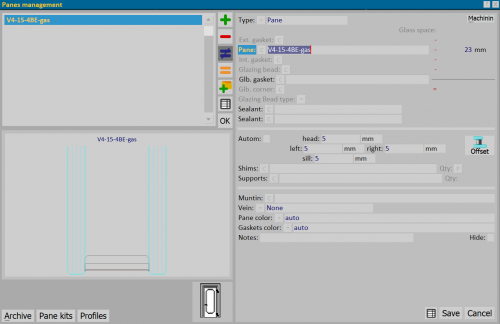
The framework contents vary according to the glass system of the typology profiles; the different cases will be explained below.
-
 : All pane management frameworks include, in addition to the basic elements of the management frameworks seen above, an extra button.
This button allows you to take the ready-made assembly of everything you need (glass, gaskets, glazing beads, etc...) from the filling archive.
- The button
 allows to access to accessories archive.
- The button
 allows to access to pane kits archive.
- The button
 allows to access to profiles archive.
Contents |
Structure of the Shutter typology, without profiles on the sash frame
- Type
 :Shows the type of filling that you want to assign to the typology, it can be Filling or Slat.
- Pane
 : It is the filling (glass or panel) or slat code.
- Glb. gasket
 : allows to enter glass perimeter accessories.
- Sealant: allows to enter the sealant for the glass.
- Autom: if selected, it makes the gap between the filling and the frame automatic and unchangeable.
- head, left, right, sill
 : These are the gap values between the filling and the frame.
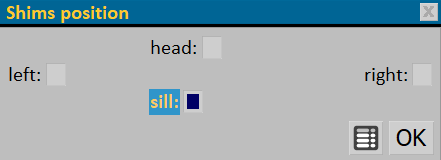
- Shims
 : Allows you to choose the thicknesses to put on the perimeter of the filling and in which amount.
- Supports
 : Allows you to choose which supports to place on the filling and in which amount.
- Muntin
 : through this button you can open muntin archive where you can choose the muntin to enter.
- Vein
 : Set the direction of the filling vein.
- Pane color
 : Allows you to match a color to the filling.
- Gasket color
 :Allows you to match a color to the gaskets.
- Notes:this field allows you to match a note to the filling that shows up on the typology in the Design Sheet.
- Hide: if active, it hides the note in the typology on the Design sheet.
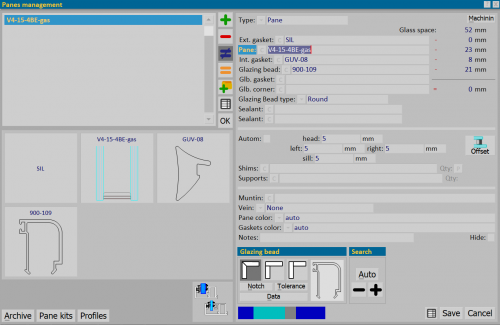
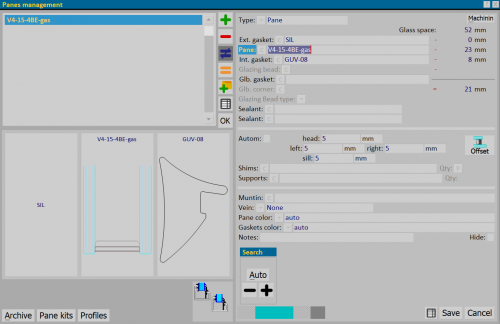
Structure with glazing bead
- Type
 : It shows the filling type that you want to assign to the typology, it can be Filling or Slat.
- Ext. gasket
 : It is the gasket to be placed on the external part of the glass.
- Pane
 :It is the code of the filling (glass or panel) or of the slat.
- Int. gasket[File:tastoc.png]]: It is the gasket to be placed on the internal part of the glass.
- Glazing bead
 : It is the code for the glazing bead profile.
- Glb gasket
 : Allows you to enter glass perimeter accessories.
- Glb corner ( glazing bead angle)
 : It is the accessory that serves to close the corners of the glazing beads, normally rounded ones. The quantity is automatically multiplied by as many angles as exist in the structure to which the fill is matched.
- Glazing Bead type
 : The function of this box is related to the Research panel, explained a little later, and it is used to indicate the aesthetic appearance of the glazing bead (sharp edge, rounded, gothic...). If you choose the type of glazing bead before starting the automatic search of components (glazing beads, gaskets...), the program will search for the most suitable glazing bead from those belonging to the indicated type.
- Sealant: Allows the insertion of glass sealant.
- Autom: if selected makes the gap between the filling and the frame automatic and unchangeable.
- head, left, right, sill
 : These are the gap values between the filling and the frame.
- Shims
 : allows you to choose the thicknesses to place on the perimeter of the filling and in which amount.
- Supports
 : Allows you to choose which supports to place on the filling and in which amount.
- Muntin
 : witch this button you can open muntin archive, where you can choose the muntin to enter.
- Vein
 : Set the direction of the filling vein
- Pane Color
 : Allows you to match a color to the filling.
- Gasket col.
 :Allows you to match a color to the gaskets.
- Notes:this field allows you to match a note to the filling that shows up on the typology in the Design Sheet.
- Hide: if active, it hides the note in the typology on the Design sheet.
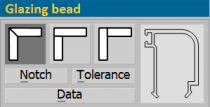
- Glazing bead framework
This panel, in addition to showing the sectional drawing of the adaptor profile, allows you to check the joints, tolerance, data, and to set the cuts.
 : Sets the angles at 45°.
 : Set the angles to 90°, with crossbar priority.
 : Sets the angles at 90°, with upright priority.
 : The operation of this button is related to the activation of the cutting angle setting buttons. In fact, if either of the two buttons that set the 90° cut is active, activating the joint button will add the joint value (entered in the technical data of the glazing bead, in profiles archive), to the longest glazing bead. Of course, if this value is positive (e.g., 25) the glazing bead will be lengthened while if it is negative (e.g., -25) it will be shortened.
 :The function of this button is related to the activation of the cutting angle setting buttons. In fact, if one of the two buttons that set the 90° cut is active, activation of the tolerance button will subtract the tolerance value entered in the technical data of the glazing bead, in profile archive, shortening all four glazing beads of the filling.
 : This button opens glazing bead data setting to vary, if necessary, some data of a single glazing bead, which is useful in case the glazing beads have to be different from each other in code, cut size or other.
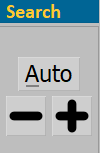
Research framework
This framework allows you to start the automatic search for components (adaptor, gaskets...) for the best sealing solution based on the glass set.
 : allows you to search for the finer and thicker inner gasket, respectively.
 : allows you to automatically search for the best sealing solution (gaskets, adaptor...) based on the glass set.
Structure with wedge glazing
- Type
 It shows the type of filling that you want to assign to the typology, it can be Filling or Slat
- Ext. Gasket
 :It is the gasket to be placed on the external part of the glass.
- Pane
 :It is the code of the filling (glass or panel) or of the slat.
- Int. Gasket
 : It is the gasket to be placed on the inside part of the glass.
- Glb gasket
 : Allows you to insert glass perimeter accessories.
- Sealant:Allows you to insert glass sealant.
- Autom: if selected makes the gap between the fill and the frame automatic and unchangeable.
- head, left, right, sill
 :These are the gap values between the filling and the frame.
- Shims
 : Allows you to choose the thicknesses to put on the perimeter of the filling and in which amount.
- Supports
 :Allows you to choose which supports to place on the filling and in which quantity.
- Muntin
 : witch this button you can open muntin archive, where you can choose the muntin to enter.
- Vein
 : Set the direction of the filling vein
- Pane color
 : Allows you to match a color to the filling.
- Gaskets color
 :Allows you to match a color to the gaskets.
- Notes:this field allows you to match a note to the filling that shows up on the typology in the Design Sheet.
- Hide: if active, it hides the note in the typology on the Design sheet.
- Research framework
This panel allows you to start the automatic search for components (adaptor, gaskets...) for the best sealing solution according to the glass set.
 :allows you to search for the finer and thicker inner gasket, respectively.
 : allows you to automatically search for the best sealing solution (gaskets, adaptor...) based on the glass set.
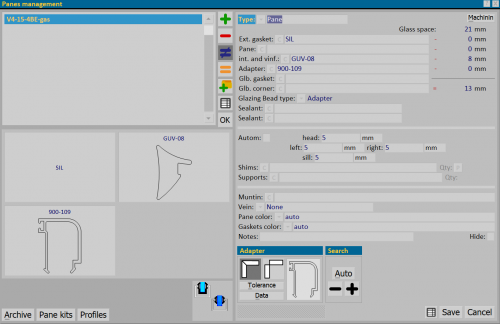
Structure with marine glazing
- Type
 : This shows the type of filling that you want to assign to the type, it can be Filling or Slat.
- Ext. Gasket
 : This is the gasket to be placed on the outside of the glass.
- Pane
 : This is the code of the filling (glass or panel) or the slat.
- int. and vinf. (inner gasket or glass to be inserted)
 : It is the seal to be placed in the inner part or it is the glass gasket to be inserted; if the latter is indicated, the outer one can not be indicated.
- Adapter
 : This is the code of the reducer used, if any.
- Glb. gasket
 Allows you to insert the glass perimeter accessories.
- Glb. corner (corner glazing bead)
 : This is the accessory that serves to close the corners of the reducer, normally rounded ones. The quantity is automatically multiplied by as many angles as exist in the structure to which the fill is matched.
- Glazing bead type : field that is filled in by the program when the reducer is chosen.
- Sealant:Allows you to insert the sealant for the glass.
- Autom: if selected, it makes the gap between the fill and the frame automatic and unmodifiable.
- head, left, right, sill
 : These are the values of the gap between the fill and the frame.
- Shims
 : Allows you to choose the gauges to be placed on the perimeter of the filling-slat and in what quantities.
- Supports
 Allows you to choose the media to be placed on the fill and in what quantities.
- Muntin
 : Pressing this key opens the muntin archive, where you can choose the Muntins to insert.
- Vein
 : Sets the direction of the filling vein
- Pane color
 : Allows you to match a color with the filling.
- Gaskets color
 : Allows you to match a color to the gaskets.
- Notes: This field allows you to match a note with the fill that appears on the typology in the Design Sheet.
- Hide: if enabled, hides the note in the type on the Design Sheet.
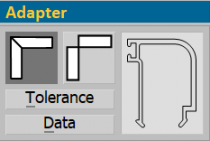
- The Adapter framework
This frame, in addition to showing the section design of the reducing profile, allows you to check joints, tolerance, data and set cuts.
 sets the angles to 45°.
 sets the profiles so that the tips lean against each other without forming an angle.
 : The operation of this button is linked to the activation of the buttons for setting the cut-off angles. In fact, if the key that adjusts the position of the profiles from tip to tip is active, the activation of the tolerance button will deduct the tolerance value entered in the technical data of the reducer, in the profiles archive, shortening all four reducers of the filling.
 : Pressing this button opens the glazing bead data setting to be able to vary, if necessary, some data of a single gearbox, useful in cases where the adaptors must be different from each other by code, cutting size or other.
- Research framework
This box allows you to start the automatic search for components (reducer, gaskets...) for the best sealing solution based on the glass set.
 allows you to search for the finer and the larger inner seal, respectively.
 allows you to automatically search for the best sealing solution (gaskets, reducer...) based on the glass set.
Structure with stepped glass
For all the structures described in the previous paragraphs, it is also possible to design a type with offset glass, in which the glass covers the frame.
This solution allows to define parameters that calculate the amount of sheet surface needed to cover the frame.
Offset glass can be placed either inside or outside the structure.
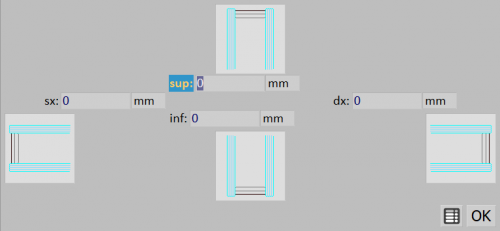
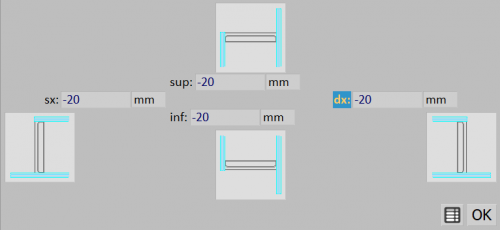
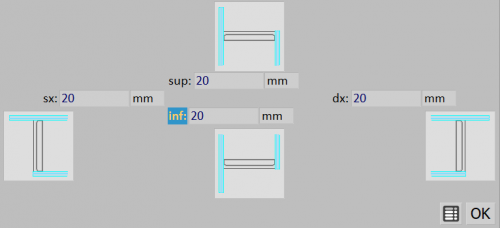
To access the Step Glass Offset panel, click the button  . In this panel you can enter the gap values for the offset glass pane.
- If the offset glass sheet is the inner one, the offset to be entered is negative.
- If the offset glass sheet is the outer one, the offset to be entered is positive.
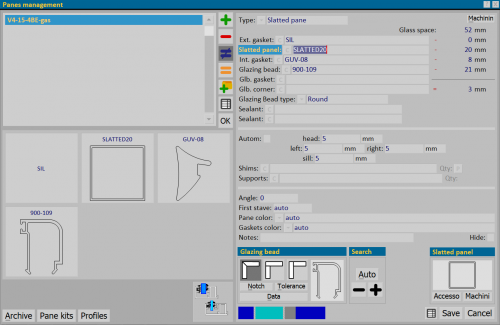
Structure with slatted pane
- Type
 : This shows the type of fill that you want to assign to the type, in this case Slat.
- Ext. Gasket
 : This is the seal to be placed on the outside of the glass.
- Slatted pane
 : This is the code of the slat.
- Int. Gasket [File:tastoc.png]]: This is the seal to be placed in the inner part of the glass.
- Glazing bead
 : This is the code of the profile of the glazing bead.
- Glb. gasket
 : Allows the insertion of glass perimeter accessories.
- Glb. corner (corner glazing bead)
 : This is the accessory that is used to close the meeting corners of glass-edges, normally rounded ones. The quantity is automatically multiplied by as many angles as exist in the structure to which the slat is matched.
- Glazing Bead type
 : The function of this box is related to the Search box, explained a little later, and it serves to indicate the aesthetic appearance of the glazing bead (sharp edge, rounded, gothic...). If you choose the type of lock before starting the automatic search for components (lock, gaskets...), the program will search for the most suitable lock belonging to the type indicated.
- Sealant
 :Allows you to insert the sealant for the glass.
- Autom: if selected, it makes the gap between the fill and the frame automatic and unmodifiable.
- head, left, ringht, sill
 : These are the values of the gap between the fill and the frame.
- Shims
 : Allows you to choose the gauges to be placed on the perimeter of the filling-slat and in what quantities.
- Supports
 Allows you to choose the media to be placed on the filling-slat and in what quantity.
- Angle
 : field for entering the angle value of the slat
- First stave
 : field for the height of the first slat.
- Pane Color
 Allows you to match a color with the filling-slat.
- Gasket color
 : Allows you to match a color to the gaskets.
- Notes: This field allows you to match a note with the fill that appears on the typology in the Design Sheet.
- Hide: if enabled, hides the note in the type on the Design sheet.
- Glazing bead framework
The function of this frame is the same as in the previous paragraphs. Its display changes based on the Glazing bead System registered in the profile (with glazing bead, push, insert).
- Research Framework
This frame allows you to start the automatic search of components (reducer, gaskets...) for the best sealing solution based on the glass set.
- [File:tastomenopiu.png]] allows you to search for the finer and the larger inner seal, respectively.
 allows you to automatically search for the best sealing solution (gaskets, reducer...) based on the glass set.
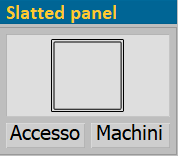
Slatted framework
This section manages the accessories and also any machining, in the same way as the accessories of the other profiles are managed in the design sheet.
- The
 button opens the management board for the accessories that are matched to the slat.
- The
 button opens the management board for the machinings associated with the slat.

