Job Batches
From Opera Wiki
(Difference between revisions)
(Created page with '{{WIP}} <!-- == Creazioni delle fasi == 500px {{NB|Per accedere a questo riquadro in Opera Gestione Commesse: nell''''Archivio Comme…') |
Monica.Sanna (Talk | contribs) |
||
| (21 intermediate revisions not shown) | |||
| Line 1: | Line 1: | ||
| - | |||
| - | + | == Creating job batches== | |
| - | + | ||
| - | + | ||
| - | + | ||
| - | == | + | |
[[Image:gestionefasicommessa.png|thumb|500px]] | [[Image:gestionefasicommessa.png|thumb|500px]] | ||
| - | {{NB| | + | {{NB|To access to this box in Opera Job Management: into '''Job Archive''', select the botton [[Image:fasicommessa.png]]. For the archive [[Job Batches]] please see the chapter dedicated}} |
| - | *''' | + | *'''Name''': it is the name of job batches ( the names used in the manual are examples). |
| - | *''' | + | *'''Order Ref.''': it is possible to specify an order reference. |
| - | *''' | + | *'''Batches ref.''': it allows to add a batch reference. |
| - | *''' | + | *'''Profile prefix''': it shows the identification code that will be assigned to profiles and panes of the job. The identification code has the function to simplify, during the assembly work, identification of leftovers and panes belonging to a job. |
| - | *''' | + | *'''Desc''': it is the description of the job phase |
| - | *''' | + | *'''Color''' [[File:tastomenutendina.png]]: it is possible to assign a color for each batch from the matched menu |
[[File:menucolori.png]] | [[File:menucolori.png]] | ||
| - | *''' | + | *'''Print full name''': it allows to see the complete name inside the job management, if disabled it will show only the first letter |
| - | *''' | + | *'''Bars''':it activates the function of calculating bars including waste and it allows to insert the price to the types of the selected step. The selection of this function is indicated by the presence of the symbol [[File:b.png|15px]] on the botton on the box '''Job Management''' ( see paragrafh below ''Assegnazione delle tipologie alle fasi'') [[File:opeconB.png]] |
{{BR}} | {{BR}} | ||
| - | {{NOTE| | + | {{NOTE| The filling in the fields belows is useful only as reminder for the program user}} |
| - | *''' | + | *'''Enable''': indicates that the batch is activated |
| - | *''' | + | *'''Starting date''': starting date of the batch |
| - | *''' | + | *'''Finishinf date''': end date of the batch |
| - | *''' | + | *'''Notes''': field to insert notes |
| - | {{NOTE| | + | {{NOTE| the management of the job batch can also take place from an archive of predefined batch, which are chosen and matched with the job. The field name allows to open the Archive of the [[Job Batches]] predefined, to which will be possible to put together the data to the specific batch of that job}} |
| - | == | + | == Batches management == |
[[Image:gestionecommessafasi.png|thumb|500px]] | [[Image:gestionecommessafasi.png|thumb|500px]] | ||
| - | + | After creating the batches, ''Opera Job Management'' shows two new bottons, as you can see in the immage. | |
{{BR}} | {{BR}} | ||
| - | + | Their use allows: | |
| - | * | + | *to assign types in job and divide them for each batches;; |
| - | * | + | *to decide number of pieces of each type for each batches; |
| - | * | + | *to choose different structures of the same type and insert the in different batches (ex. Curtain Wall) |
| - | === | + | ===Assignment of typologies=== |
[[Image:gestionecommessafasi1.png|thumb|500px]] | [[Image:gestionecommessafasi1.png|thumb|500px]] | ||
| - | * | + | *Select the botton [[File:ope1.png]] and then the botton [[File:+.png]]; |
| - | * | + | *Choose types to assign to the phase by selecting with the mouse; |
| - | * | + | *Once finished the assignment, the box Job Management will appear as the immagine on the side below. |
{{BR}} | {{BR}} | ||
[[Image:gestionecommessafasi2.png|thumb|500px]] | [[Image:gestionecommessafasi2.png|thumb|500px]] | ||
| - | * | + | *Deselect the botton '''Operatore 1''' e select the botton [[File:ope2.png]] in the box; |
| - | * | + | *Repeat the steps see earlier; |
{{BR}} | {{BR}} | ||
[[Image:gestionecommessafasi7.png|thumb|500px]] | [[Image:gestionecommessafasi7.png|thumb|500px]] | ||
| - | * | + | *once finished the assignment, the box Job Management shows as the immagine on the side below. |
{{BR}} | {{BR}} | ||
| - | === | + | ===Assignment of pieces for a single typologies=== |
[[Image:gestionecommessafasi4.png|thumb|500px]] | [[Image:gestionecommessafasi4.png|thumb|500px]] | ||
| - | * | + | *After having been assigned types to the phases, we can also decide number of pieces for each type |
| - | + | Select a type and open the box as the immage on the side below. | |
| - | * | + | *With the button [[File:tastodiverso.png]] insert the number of pieces for each type in the batch |
{{BR}} | {{BR}} | ||
| - | + | ||
| - | * | + | *Finished the operation in the box Job Management for each type will be indicated number of assinged pieces. |
{{BR}} | {{BR}} | ||
| - | === | + | ===How to join the job batches=== |
| - | + | ||
| - | * | + | *After having been assigned types to steps, we can decide to put together to work combined. To do this will be necessary select the steps to put together and push the button[[File:tastounionefasi.png]] of modify for few seconds until will appear the window below |
| - | + | ||
| - | + | ||
| - | + | ||
| - | + | ||
{{BR}} | {{BR}} | ||
| + | *Once we have connected the steps, the box Job Management show as in the immagine below | ||
| + | {{NB| It will be not possible to split the steps once matched}} | ||
| + | {{BR}} | ||
| - | === | + | ===The buttons of batch panel=== |
[[Image:finestragestionefasi.png|thumb|500px]] | [[Image:finestragestionefasi.png|thumb|500px]] | ||
| - | * | + | *The button [[File:tastocongelafasi.png]]:it allows to freeze all types in each phase |
| - | * | + | *The button [[File:tastogestionefasi.png]]: it allows to open the frame of job batches management. |
| - | *<span style="background-color: #FFFF00"> | + | *<span style="background-color: #FFFF00"> The button [[File:tastomostrafasi.png]]: it allows to see the panel of the batches on the side of types of the job '''(available from version 3.8.4)'''</span> |
| - | |||
<!-- HELP: JM/W7703 --> | <!-- HELP: JM/W7703 --> | ||
[[Category:JM/Manual]] | [[Category:JM/Manual]] | ||
Latest revision as of 15:03, 6 May 2021
Contents |
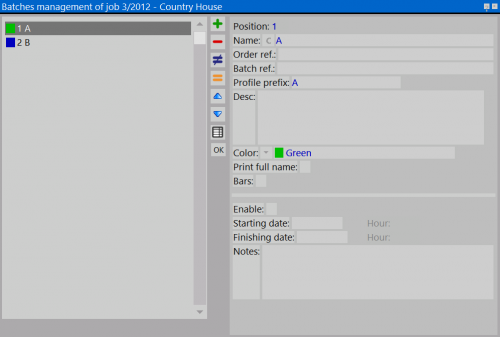
Creating job batches
 . For the archive Job Batches please see the chapter dedicated
- Name: it is the name of job batches ( the names used in the manual are examples).
- Order Ref.: it is possible to specify an order reference.
- Batches ref.: it allows to add a batch reference.
- Profile prefix: it shows the identification code that will be assigned to profiles and panes of the job. The identification code has the function to simplify, during the assembly work, identification of leftovers and panes belonging to a job.
- Desc: it is the description of the job phase
- Color
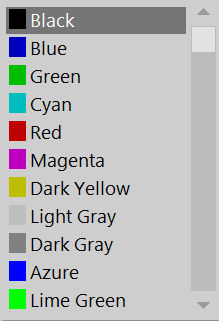
 : it is possible to assign a color for each batch from the matched menu
- Print full name: it allows to see the complete name inside the job management, if disabled it will show only the first letter
- Bars:it activates the function of calculating bars including waste and it allows to insert the price to the types of the selected step. The selection of this function is indicated by the presence of the symbol File:B.png on the botton on the box Job Management ( see paragrafh below Assegnazione delle tipologie alle fasi) File:OpeconB.png
The filling in the fields belows is useful only as reminder for the program user
- Enable: indicates that the batch is activated
- Starting date: starting date of the batch
- Finishinf date: end date of the batch
- Notes: field to insert notes
the management of the job batch can also take place from an archive of predefined batch, which are chosen and matched with the job. The field name allows to open the Archive of the Job Batches predefined, to which will be possible to put together the data to the specific batch of that job
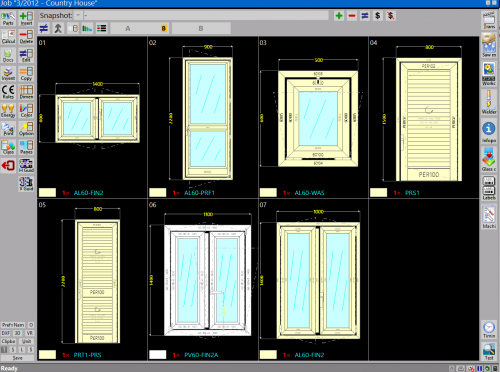
Batches management
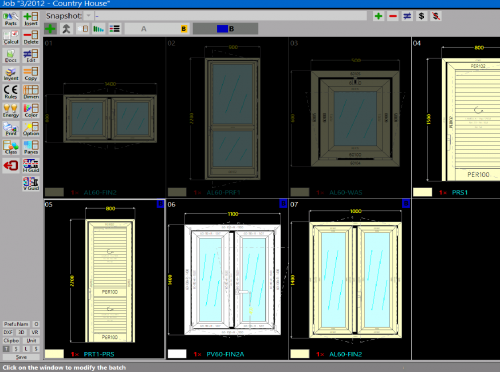
After creating the batches, Opera Job Management shows two new bottons, as you can see in the immage.
Their use allows:
- to assign types in job and divide them for each batches;;
- to decide number of pieces of each type for each batches;
- to choose different structures of the same type and insert the in different batches (ex. Curtain Wall)
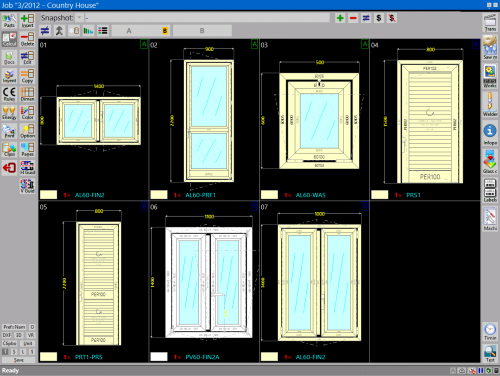
Assignment of typologies
- Select the botton
 and then the botton
  ;
;
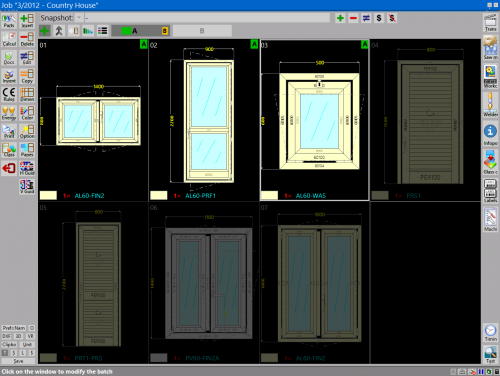
- Choose types to assign to the phase by selecting with the mouse;
- Once finished the assignment, the box Job Management will appear as the immagine on the side below.
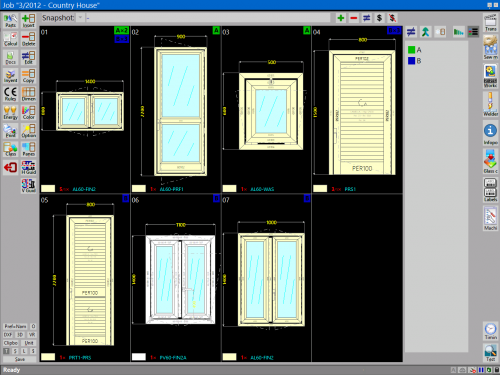
- once finished the assignment, the box Job Management shows as the immagine on the side below.
Assignment of pieces for a single typologies
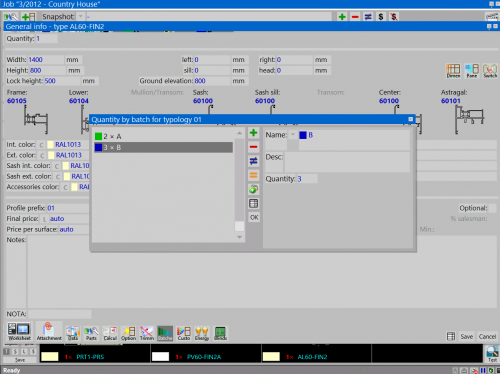
- After having been assigned types to the phases, we can also decide number of pieces for each type
Select a type and open the box as the immage on the side below.
- Finished the operation in the box Job Management for each type will be indicated number of assinged pieces.
How to join the job batches
- After having been assigned types to steps, we can decide to put together to work combined. To do this will be necessary select the steps to put together and push the button
 of modify for few seconds until will appear the window below
- Once we have connected the steps, the box Job Management show as in the immagine below
