How to create a job snapshot
From Opera Wiki
Monica.Sanna (Talk | contribs) (→How to create a snapshot) |
Monica.Sanna (Talk | contribs) (→How to create a snapshot) |
||
| (One intermediate revision not shown) | |||
| Line 13: | Line 13: | ||
{{BR}} | {{BR}} | ||
==How to create a snapshot== | ==How to create a snapshot== | ||
| - | [[File:snapshot1.png]] | + | [[File:snapshot1.png|thumb|left|500px]] |
| + | |||
Now we can see how to use these function with an example job, composed by two types, as showed below, with white color. Now we suppose that the customer requests a quotation for the job indicated and for the same types but with different color. With standard procedure you should duplicate the current job, create a new one and change the color. | Now we can see how to use these function with an example job, composed by two types, as showed below, with white color. Now we suppose that the customer requests a quotation for the job indicated and for the same types but with different color. With standard procedure you should duplicate the current job, create a new one and change the color. | ||
| Line 25: | Line 26: | ||
{{BR}} | {{BR}} | ||
| - | + | ||
Now we proceed to modify the colors of the job according to the information. Once finished the procedure, please repeat the previous steps to create a new snapshot, we will give a name and a description of it. At this point our job will incluedes two different variants of types, meanwhile general information of the job will remain unchanged (such customer information, building site information and so on...). | Now we proceed to modify the colors of the job according to the information. Once finished the procedure, please repeat the previous steps to create a new snapshot, we will give a name and a description of it. At this point our job will incluedes two different variants of types, meanwhile general information of the job will remain unchanged (such customer information, building site information and so on...). | ||
Now every time it will be possible to push the botton [[Image:tastomenutendina.png]] linked to the snapshot and choose between the screeshots availables. In the immage below you can see the result of the two our snapshot examples. | Now every time it will be possible to push the botton [[Image:tastomenutendina.png]] linked to the snapshot and choose between the screeshots availables. In the immage below you can see the result of the two our snapshot examples. | ||
| - | [[Image: | + | [[Image:snapshot2.png|thumb|right|400px]] |
{{BR}} | {{BR}} | ||
| - | {{ | + | {{NOTE| The example has been simplified, but you can understand that the types can be completely differents from one snapshot to anothers}} |
{{BR}} | {{BR}} | ||
Revision as of 09:26, 7 May 2021

For snapshot it means a screenshot of the job, that records the status and all information included in that moment. These status can be selected by a drop-down menu. The main application of this function is to avoid to create many jobs, for example the customer could request differents quotations for the same job and structures but in differents colors and accessories. For this reason it is possible to assemble all these changes in the same job without creating a new one.
The snapshot bar is composed by: a drop-down menu, ![]() which let you to select a snapshot needed among those already created, an information bar and function boxes
which let you to select a snapshot needed among those already created, an information bar and function boxes ![]()
![]()
![]() which allows to insert, create or modify a snapshot.
which allows to insert, create or modify a snapshot.
The current status of the job has been identified in the field snapshot from a voice -. When this voice is selected, it will be possible to insert and change inside type of the job.
How to create a snapshot
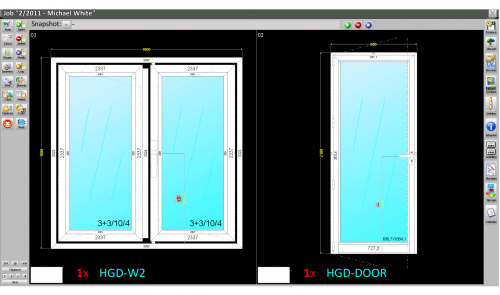
Now we can see how to use these function with an example job, composed by two types, as showed below, with white color. Now we suppose that the customer requests a quotation for the job indicated and for the same types but with different color. With standard procedure you should duplicate the current job, create a new one and change the color.
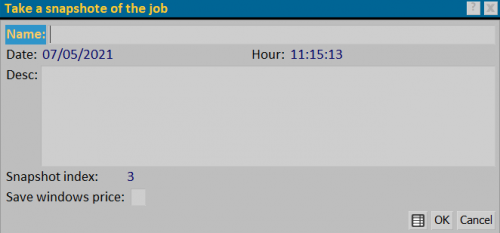
In these case we will preoceed in different way: first of all save the current status of the job, by creating a first snapshot. If you click on the box ![]() it will open a box in which it will appear different fields to fill in:
it will open a box in which it will appear different fields to fill in:
- Name: Name to give to the snapshot
- Date/Hour: Date and hour of creation of the snapshot (filled in automatically)
- Desc: Snapshot description
- Snapshot index: it indicates in which position of the list will appear (filled in automatically)
- Save windows price: it allows to mantain prices unchanged.
By pushing the botton ![]() it will be created the snapshot and added in the list.
it will be created the snapshot and added in the list.
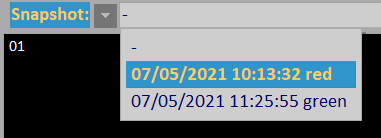
Now we proceed to modify the colors of the job according to the information. Once finished the procedure, please repeat the previous steps to create a new snapshot, we will give a name and a description of it. At this point our job will incluedes two different variants of types, meanwhile general information of the job will remain unchanged (such customer information, building site information and so on...).
Now every time it will be possible to push the botton ![]() linked to the snapshot and choose between the screeshots availables. In the immage below you can see the result of the two our snapshot examples.
linked to the snapshot and choose between the screeshots availables. In the immage below you can see the result of the two our snapshot examples.
The example has been simplified, but you can understand that the types can be completely differents from one snapshot to anothers
How to modify a snapshot
To delete, it is enough select the snapshot involved from the list that appears by pushing the button ![]() and then pushing the following one
and then pushing the following one ![]() : it will appear a message (immage on the side below), and you have to confirm it with the botton
: it will appear a message (immage on the side below), and you have to confirm it with the botton ![]() if you want to cancel it.
if you want to cancel it.


