Typologies
From Opera Wiki
(Difference between revisions)
(→How Opera calculates the typology cut lists) |
(→Content description) |
||
| (3 intermediate revisions not shown) | |||
| Line 41: | Line 41: | ||
==Content description== | ==Content description== | ||
| - | *[[File:tastostampa2.png]]: | + | *[[File:tastostampa2.png]]: allows you to print the type schedules for the types included in the file, or to print the codes, with a description of the type. |
<!--[[Image:quadroinviotipologia.png|thumb|400px|right|il quadro di invio tipologia]]--> | <!--[[Image:quadroinviotipologia.png|thumb|400px|right|il quadro di invio tipologia]]--> | ||
| - | *[[File:tastoinviocommessa.png]]: | + | *[[File:tastoinviocommessa.png]]: this button is used to send a typology to Opera Company technical dept. The user can choose the recipient address from a list and add a note, if required. Once confirmed, the program will create a new draft e-mail with the typology file in attachment. |
| - | [[Image:messaggiotipologietemplate.png|thumb|500px]] | + | <!--[[Image:messaggiotipologietemplate.png|thumb|500px]] |
*[[File:tastotemplate.png]]: vi apparirà il messaggio mostrato a lato: | *[[File:tastotemplate.png]]: vi apparirà il messaggio mostrato a lato: | ||
::scegliendo Opzioni sarà possibile impostare alcuni paramentri di visualizzazione; | ::scegliendo Opzioni sarà possibile impostare alcuni paramentri di visualizzazione; | ||
::scegliendo Template, invece, sarà possibile creare un template della propria tipologia. | ::scegliendo Template, invece, sarà possibile creare un template della propria tipologia. | ||
| + | --> | ||
| - | {{ | + | *'''Name''': the typology code. |
| - | *''' | + | *'''Custom.''' (Customization): an additional code used to customise the real code of the typology |
| - | + | :{{NOTE|The customise code is used in case of two typologies having identical codes but with slight differences, such as in the materials. In this case an additional code may be added in order to highlight the differences between the two typologies.}} | |
| + | *'''System'''[[File:tastomenutendina.png]]: the system it belongs to. | ||
| + | *'''Series'''[[File:tastomenutendina.png]]: the series it belongs to. | ||
| + | *'''Window class'''[[File:tastomenutendina.png]]: the category code of the typology. See [[Window_classes]] for more info. | ||
| + | *'''Desc.''': describes the features of the typology. | ||
| + | *'''Change opening description''':this function operate on the structure’s description, precisely in the description of the opening side, lets see the following picture | ||
| - | + | :{{NB|In order for the function to work properly is essential to write the opening side in the description eg.: ''Opening to the left'' / ''Opening to the rigth''. This allows to change the opening side automatically in the description when in the [[image:tastomanovra.png]] is pressed within [[Worksheet]].}} | |
| - | + | ||
| - | + | ||
| - | + | ||
| - | + | ||
| - | + | ||
| - | + | ||
| - | + | ||
| - | + | *'''Code opening character'''[[File:tastomenutendina.png]]: same as above, but this works on the ''Name'' field, pointing the opening side. It is up to the user to write in this field the position of the character within the typology name that indicates the opening side. | |
| + | :{{NB|In order for the function to work properly is essential to write the opening side as a single character (''L'' or ''R'') in the ''Name'' field. This allows to change the opening side automatically in the description when in the [[image:tastomanovra.png]] is pressed within [[Worksheet]].}} | ||
| - | + | *'''No color''': if enabled, specifies that the window does not support colors. | |
| - | *''' | + | |
| - | + | ||
| - | + | <!-- | |
| - | + | ||
| - | + | ||
| - | + | ||
| - | + | ||
*'''Escludi dai carrelli''': L'attivazione di questa casella esclude la tipologia dai carrelli, se questa funzione è impostata nei parametri di Taglio, dal menù Officina. | *'''Escludi dai carrelli''': L'attivazione di questa casella esclude la tipologia dai carrelli, se questa funzione è impostata nei parametri di Taglio, dal menù Officina. | ||
*'''N° strutture''': Riporta il numero di strutture con cui è composta la tipologia. | *'''N° strutture''': Riporta il numero di strutture con cui è composta la tipologia. | ||
*'''Fattore tipologia''': Abbina alla tipologia un numero puro che consente di fare delle statistiche sui costi dei materiali impiegati per la realizzazione degli infissi. | *'''Fattore tipologia''': Abbina alla tipologia un numero puro che consente di fare delle statistiche sui costi dei materiali impiegati per la realizzazione degli infissi. | ||
*'''Ignora calcoli timing''': Attivando questa casella l’operatore disattiva il calcolo dei tempi di lavorazione su questa tipologia. | *'''Ignora calcoli timing''': Attivando questa casella l’operatore disattiva il calcolo dei tempi di lavorazione su questa tipologia. | ||
| - | + | ||
*'''Scelta telaio-anta''': L'attivazione di questo flag consente di visualizzare la sezione del telaio e dell'anta nei Dati della tipologia visibili nella commessa e di intervenire su di essi, senza dover rientrare nel Foglio di progettazione. | *'''Scelta telaio-anta''': L'attivazione di questo flag consente di visualizzare la sezione del telaio e dell'anta nei Dati della tipologia visibili nella commessa e di intervenire su di essi, senza dover rientrare nel Foglio di progettazione. | ||
*'''Codice troncatrice''': Invia il codice della tipologia alla troncatrice. | *'''Codice troncatrice''': Invia il codice della tipologia alla troncatrice. | ||
Latest revision as of 15:19, 28 June 2011
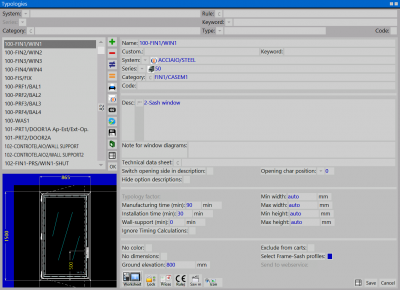
This archive is used to store, create or modify structures according to the need while developing the quotation.
Contents |
Basic notions
In Opera, a typology (or window type) indicates a finished and ready to use window or door frame made up of one or more elements called structures, made up of profiles and accessories
- A single structure typology will be, for example, a window
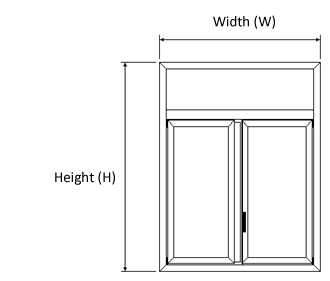
- A typology made up of two structures will be, for example, a window with an overhead window
It is clear that the most important element of the typology is the structure: to create a typology, in fact, the single structures must be realised first, or the ones that have already been prepared may be used and linked to each other.
How Opera calculates the typology cutting lists
Based on the total width and height of the typology, the profile cut lists are calculated taking into consideration the following factors:
- technical data (or dimensions data) specified in the profiles archive (encumbrance, overlaps, clearances... see the [[Profiles] for more info).
- possible cut formulas relative to the typology profiles. If the typology has cut formulas, the technical data of the profiles will not be taken into consideration and the cut list calculation will be based on the formulas.
- the internal or external cut type set out on the selected saw (see the Cutting parameters for more info).
Content description
 : allows you to print the type schedules for the types included in the file, or to print the codes, with a description of the type.
 : this button is used to send a typology to Opera Company technical dept. The user can choose the recipient address from a list and add a note, if required. Once confirmed, the program will create a new draft e-mail with the typology file in attachment.
- Name: the typology code.
- Custom. (Customization): an additional code used to customise the real code of the typology
 NOTE:
NOTE:
The customise code is used in case of two typologies having identical codes but with slight differences, such as in the materials. In this case an additional code may be added in order to highlight the differences between the two typologies.
- System
 : the system it belongs to.
- Series
 : the series it belongs to.
- Window class
 : the category code of the typology. See Window_classes for more info.
- Desc.: describes the features of the typology.
- Change opening description:this function operate on the structure’s description, precisely in the description of the opening side, lets see the following picture
 N.B: In order for the function to work properly is essential to write the opening side in the description eg.: Opening to the left / Opening to the rigth. This allows to change the opening side automatically in the description when in the
  is pressed within Worksheet.
- Code opening character
 : same as above, but this works on the Name field, pointing the opening side. It is up to the user to write in this field the position of the character within the typology name that indicates the opening side.
 N.B: In order for the function to work properly is essential to write the opening side as a single character (L or R) in the Name field. This allows to change the opening side automatically in the description when in the
  is pressed within Worksheet.
- No color: if enabled, specifies that the window does not support colors.


