General info - type
From Opera Wiki
Contents |
Typology data
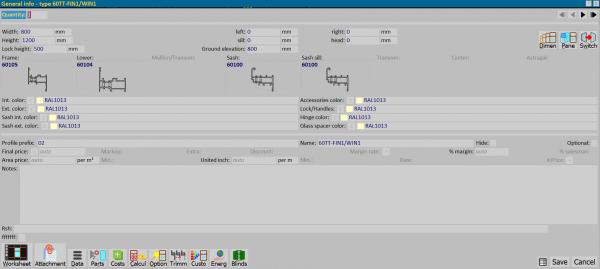
- Quantity: in this box should be reported the amount of types produced.
- Width/Height: are the circumferential dimensions of the typology excluding any flap (or cover).
When you set the dimensions of the type, you must enter the value that you have detected by measuring the space on which the type will be assembled, separating the short distance between the wall and the frame. However, this short distance can be set directly on the type as a gap value between frame and wall so that it is automatically separated.
- Lock height: to determine the position of the lock in the frame, you can now use this box in the general info.
- Left/Right/Sill/Head: these boxes have the function of allowing the loading of a gap value between the frame and the wall.
- Int. Color, Ext. Color, Sash int. Color, Sash ext. Color, Glazing bead color, Accessories color, Lock/Handles, Hinge color, Hardware color, Glass spacer color: in these fields is entered the chosen coloring for the entire type, including accessories, and any possible changes. The user chooses by pressing the button corresponding to each box and connecting with the color selection the color to be matched to the structure.
Quick keys
 : allows a link to Worksheet to change certain dimensions of the typology or to change the Arch or Oversized type.
 : allows you to manage pane on the single type without necessarily having to go to the Worksheet.
 : Allows to switch the movement or the opening direction of the structure.
Sales data
- Profile prefix: shows the identification code that will be assigned to the profiles and panes of the type.
The identification code is a code whose function is to make it easy, during assembling, to identify the blanks and panes belonging to a type.
- Name: is the name you want to assign to the type. It is automatically matched to the name (or code) you have in archive but it can be changed to facilitate understanding in prints.
- Optional: activating this box makes the type optional in the quote. It will be reported in the Job Management panel.
- Final price: In this box you can enter the final price of the type. The price must be entered excluding VAT. If a final price is entered, the program will not calculate any costs of the type, but will consider the entered price valid, to which it will add only the VAT cost.
- Discount: in this box you can enter the discount of the types if a final price is active.
- % margin: in case a final price is set, the program will automatically calculate the margin percentage by comparing the costs of the type. In case you do not enter a finale price you can set a custom margin percentage for the type.
- %salesman: in case a final price is forced, activating this box will allow the salesman's percentage to be applied to the price.
- Price per surface”/”Min: these two boxes are linked to those find in the Tipologies archive. If in the archive, the typology has been matched to the price per square meter and a minimum billing, when the typology is loaded in the job, these boxes read its values. They can be manually activate even if the typology has no settings for this in archive.
- Price per length (L+H)”/”Min.: is the price obtained by multiplying the price per metre for the sum of width + height.
- Notes: in this field we can enter any notes on the typology, which will appear in the print of the typology scheme, to the attention of workers that they will do the work.
Action keys
 : provides access to the Worksheet relating to the selected typology in the job, to make any changes.
 : opens the attachment archive of the job, in which you can attach other documents related to the typology selected in commission (e.g.: information material). The buttons in this pane must be used in the same manner seen to attach images or any other type of document.
 : In the frame opened by this button, the operator has the possibility to customize the Type data on the job. They will then be printed.
-
 : opens the materials management framework of the single typology where all the materials belonging to the typology will be listed with the relative weights, prices, stock situation, etc... For the contents and the operation see at the beginning of the chapter the explanation of the homonymous button.
-
 : opens the frame of Typology cost management of the single typology where it will be possible to enter the extra costs that you want impute to the typology.
where the production costs and customer cost are reported. No box is directly editable except for the two extra job entry boxes.
-
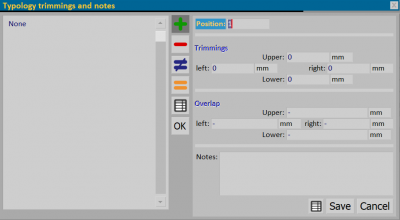
 : opens the frame Typology trimmings and notes, in which it’s possible to set a trim value of the frame profile line:
As you can see from the picture on the side, it is a question of determining on the four sides, which match the trim size to the frame. In the Position box, the program shows the numbering related to the position of the typology in the job management; in the Notes box, the operator can enter reference data. The measures set in this frame are then reported in the print of the complete schemes.


