How to make a shutter
From Opera Wiki
Contents |
If your typology calls for the filling to be with slats (thus louvered), the operator should keep in mind that the methods of creating the perimeter of both the fixed and the sash, are the same as those already explained. So after inserting the perimeter profiles, and their accessories let's see how and where to act to make the structure become a shutter.
The operation will start from the bottom width of the sash, bring yourself to it by acting to move inside the structure with the buttons File:Arrowsx.png File:Arrowdx.png and positioning yourself by clicking within the area inherent to the bottom width. After clicking the File:Keymodified.png button and then the ![]() button, the following picture will open:
button, the following picture will open:
- We select the File:Cue.png button to open the Profile Selection panel:
- From the next screen, select the profile and confirm with

The program will return to the Structure Definition Chart, repeat the same operations, and also enter the Terminal Persian Cue File:Cue2.png
Now it is necessary to insert the end plate holder:
- On the add bottom profile picture click on the Inner Carryover button: File:Carryover.png;
- On the Profile Selection panel, select the saddle holder under Positioner and click
 :
:
In this case you are creating a shutter with movable slats, so by pressing the File:Autoselect.png button, you are going to enter the automatic self-selection for the Handling Mechanisms. If your shutter is with fixed slats, you will instead have to enter the saddles to position the slats by pressing the File:Kit.png button The Accessory Selection panel will open, select the one you want and press ![]() to return to the Shutter Accessories panel. Then press the File:Record.png button and then
to return to the Shutter Accessories panel. Then press the File:Record.png button and then ![]() to return to the Structure Definition Picture.
At this point to finish all the insertion of the profiles needed for the shutter you will have to move to the upper width to insert the end slat holder Press on the
to return to the Structure Definition Picture.
At this point to finish all the insertion of the profiles needed for the shutter you will have to move to the upper width to insert the end slat holder Press on the ![]() button and on the Add Profile picture press on the File:Carry-in.png button; after selecting the accessory press
button and on the Add Profile picture press on the File:Carry-in.png button; after selecting the accessory press ![]() .
.
If you have performed all the operations correctly, all you have to do is press the button to move to the next sash (if the type is multi-sash), and repeat the operations you performed for the previous sash.
When you have finished, re-entering the Design Sheet, you will have the type highlighted as in the figure. The basic operations to create the shutter, as you may have noticed take place in the lower width of the structure sashes. In fact, the program will display the slats in the Design Sheet only if you have entered the slats in the lower widths of the sashes and in the slat accessories, the self-selections of the movement mechanisms, for adjustable shutters, or the saddles in the case of the fixed slat shutter. The operator will therefore have to take great care in inserting in the right position especially these two components.
Insert the end plate holders to the center band
You have created a louvered French Window and applied a center band to it, you now have the need, to apply the carry-over for the end slat. From the Design Sheet click on the fascia, the following picture will open:
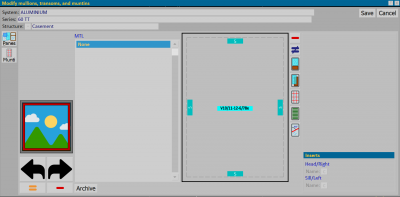
Click on File:MTI.png and open the Mullion-Crossbeam and Muntin Management panel:
Click in the center of the louver (Pers=ON), a small box will appear from which you must select the File:Traverse.png button.
The Profile Selection pane will open at this point: after selecting the desired sash click ![]() and you will be taken back to the Mullion-Crossbeam and Inglesina Management pane; a mask will indicate that the profile has matching accessories:
and you will be taken back to the Mullion-Crossbeam and Inglesina Management pane; a mask will indicate that the profile has matching accessories:
Select the File:Keyosi.png button and return to the Manage mullions-crossbars and muntin bars panel.
- Now we need to insert the Sup/Dx and Inf/Sx carryovers: click for both on File:Code.png and choose Positioner; click
 .
.
- We select
 and repeat the operation for the lower carryover. We click on
  to duplicate the carryovers in the second shutter.
When you have finished operations, press the File:Record.png button located in the upper right-hand corner of the Mullion Management crossbars and muntin bars panel. This is what appears in the Design Sheet:


