How to manage the Inventory
From Opera Wiki
Contents |
button. In this chapter we will deal with the warehouse from the job order since, if you manage the warehouse entirely from the job order, the Warehouse archive is filled in automatically.
Remember that to learn more about the contents, the function of the buttons and boxes you can see in Section 3', under the chapter Job Archive and in Section 5, under the chapter Management.
General settings
Proper management of the warehouse requires the operator, to take an inventory of the material in stock that you want the program to manage. Only after verifying the amount of material in stock can you begin the management of the Warehouse.
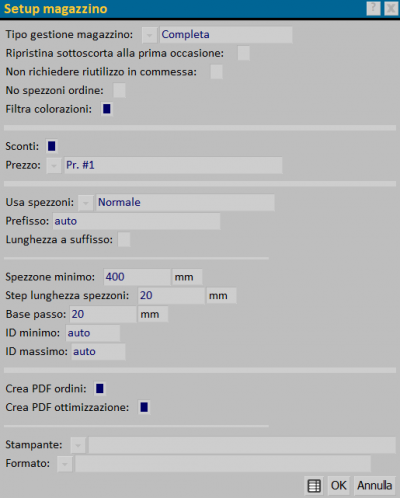
The first step for automatic management of materials in the warehouse is to set in Warehouse Setup (Warehouse -> Warehouse Setup), the field Warehouse Management Type.
In the case where you intend to handle the blanks with Opera you must always set in the stock setup, the fields Use Blanks and Minimum Blank. and consequently the length of the smallest useful blank.
Entering items into the Warehouse from the Job Management panel
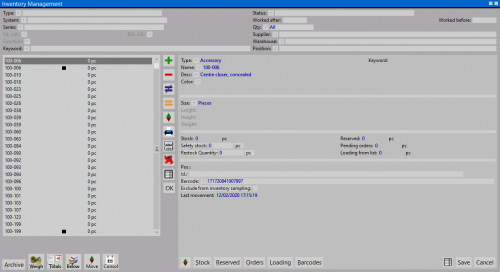
Take yourself to the Job Management panel and press the File:Keymaterials.png button to open the Job Material panel, and below that the File:Keymaterial2.png button to open the following panel:
- Click on the
 button to enter a new article.
- Select the Type
 in the relevant field, from those proposed (Profile, Accessories, Other).
- Set the Name File:Keyoc.png of the item, from the Profile selection panel.
- Enter the coloration ('Col. int./Col. est.File:Keyoc.png), from the Coloration selection panel.
- Set the''Unit of Measurement
 , the amount of Pieces in stock inherent in the coloring you set, and, possibly, the amount of material you have already committed (Committed File:Keyov.png), for ongoing or upcoming workings.
- Enter the order data, pertaining to the purchase of the material you are registering, by filling in the fields Already ordered, Minimum stock, and In charge from list, which the program will enter in order in the printout to the supplier.
Now press the ![]() button, and repeat the above operations for other material or for the same material with different coloring. When you have loaded all your stock material into Opera's Warehouse, you are ready to manage orders by performing loading, unloading, and order and stock management.
button, and repeat the above operations for other material or for the same material with different coloring. When you have loaded all your stock material into Opera's Warehouse, you are ready to manage orders by performing loading, unloading, and order and stock management.
Inventory Management from the Job Order
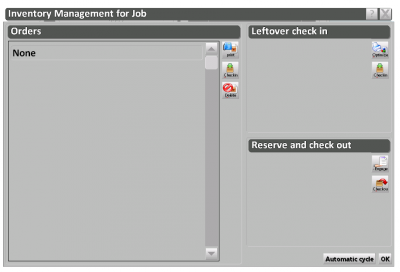
Let's open the Job Order Management framework and press the File:Keywarehouse.png button to open the Job Order Warehouse Management framework. The framework is divided into three areas, each of which has a fundamental function; therefore, it is a good idea for the operator to memorize the buttons and their locations within each of them, because it will be necessary to move from one section to another in the various Phases of management.
Orders Area
This is the area for printing orders. Based on inventories, in this area you can order and print the materials that are needed for the development of the job order. Generally, the orders for profiles, glass and accessories turn out to be separate. When the material is delivered, you must then proceed to loading the delivered material: during loading you can change the quantities if those delivered are not equal to those ordered (in this case the order for only those materials not yet delivered remains in place).
The Commitment and Discharge Area
Material related to the job order (still on order or in stock) must be committed in such a way that it is considered unavailable for further jobs that have the same materials. When the job is complete, it will be necessary to unload previously committed materials.
The Optimization and Slice Loading Area.
In this area you manage the optimization of cuts with chunks (must have "use chunks" active in the cut area). By pressing on the optimize button you can show on screen and print the optimization (the same as in "tabs" from the main job page).
The Order and Load Area
- The first step in the job order is to select the File:Keywarehouse.png button. The program opens the picture related to the creation of documents in the warehouse and shows for each material in the job order the requirement for the production of the fixture and all other information recorded in the Opera warehouse. The last column shows the quantities to be ordered, highlighted by a red dot.
- The second step is done by clicking on the File:Keyreadocuments.png button; this will open the "Order Stock Document Archive," where the order documents are saved.
From this Archive, it is possible to make printouts of the BOMs for the referenced supplier.
- The third and final step concerns material loading. In the "Order Warehouse Document Archive," pressing the File:KeyExecutingMovement.png button at the document to be handled opens the "Order WarehouseMovement " pane.
Selecting the File:KeyHandling.png button causes the profiles to be loaded into the warehouse, and the document in the archive is no longer active.
The Commitment and Discharge Area
- The first step in the job order, in case you want to commit the material so that it will not be used for other work, is to select the File:Keywarehouse.png button and in the framework related to the creation of documents in the warehouse verify for each material in the job order the need for the production of the frame and which of them will be committed according to their presence in the Opera warehouse.
- The second step is done by clicking on the File:Keyreadocuments.png button; this opens the "Job Stock Document Archive," where the commitment documents are saved.
- The third and final step involves unloading the material. This operation is performed when the material has been used in the production of the fixture. In the "Job Order Stock Document Archive," pressing the File:Keymoving.png button at the document to be moved opens the "Order Stock Movement" pane. Selecting the File:KeyHandling.png button unloads the profiles from the warehouse and the document in the archive is no longer active.
The Optimization and Slice Loading Area.
- The first step in the job order is to select the key File:Keywarehouse.png
If in the "Print Setup" of the Warehouse the reuse of offcuts is active, Opera optimizes the cutting of profiles taking this stock into account. File:Finestrariutilizzospezzoni.png
Clicking on the File:Key-use.png button in the side mask shows the profiles and blanks to be used for cutting based on the job requirement, stock and commitment, and new blanks.
- The second step is done by clicking on the File:Keyreadocuments.png button; this opens the "Job Warehouse Document Archive," where the cutting optimization documents are saved.
From this Archive, BOM printouts for the workshop can be made, and the pieces left in the Opera warehouse are loaded.
- The third and final step concerns the unloading of the material used in the production of the fixtures. In the "Job Warehouse Document Archive," pressing the File:Keyfeed.png button at the document to be handled opens the "Optimization Warehouse Handling" pane. Selecting the File:KeyHandling.png button unloads the profiles from the warehouse and the document in the archive is no longer active.


