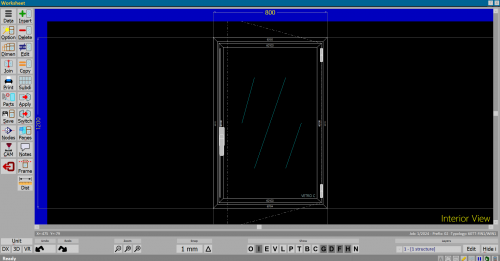
Worksheet
From Opera Wiki
(Difference between revisions)
Monica.Sanna (Talk | contribs) (→Action Buttons) |
Monica.Sanna (Talk | contribs) (→Action Buttons) |
||
| Line 19: | Line 19: | ||
*[[File:tastomateriali.png|58x58 px]]: with this button you can open the Parts box to see or change parts of the typology (see Job Management). | *[[File:tastomateriali.png|58x58 px]]: with this button you can open the Parts box to see or change parts of the typology (see Job Management). | ||
{{NB|It is important not to confuse the function of this framework, which is above all that of consultation (e.g., to check the quantities of parts or the rightness of the codes...), while it is not properly that of entry or handling of the materials of the typology, which is in fact done in another way as will be seen later in this same chapter.}} | {{NB|It is important not to confuse the function of this framework, which is above all that of consultation (e.g., to check the quantities of parts or the rightness of the codes...), while it is not properly that of entry or handling of the materials of the typology, which is in fact done in another way as will be seen later in this same chapter.}} | ||
| - | *[[File:tastonodi.png]]: it activates [[Node Definition Window]]. | + | *[[File:tastonodi.png]]: it activates ''Display single node'', for which see the chapter [[Node Definition Window]]. |
*[[File:tastocam.png]]: shows the tool machinings on the profile, sent by the program to the machining center, where it is present. For further information on Opera CAM, please see the [[Manual_of_Opera_CAM|reference manual]]. | *[[File:tastocam.png]]: shows the tool machinings on the profile, sent by the program to the machining center, where it is present. For further information on Opera CAM, please see the [[Manual_of_Opera_CAM|reference manual]]. | ||
*[[File:tastoinser.png]]: it needs to [[Select typologies|insertion in Worksheet]] of structures to be used to make the typology. | *[[File:tastoinser.png]]: it needs to [[Select typologies|insertion in Worksheet]] of structures to be used to make the typology. | ||
Revision as of 15:19, 8 July 2025

The Worksheet Is a tool that allows you to make and design types, from the most common to the most complex.
Content description
Action Buttons
 : with this button you can assign or change the general data of the typology.
 : if in the box that allows to assign accessories is active the optional field, pressing this button opens a window that has the function of choosing the options matched to a typology in the Worksheet.
 : with this button you can assign the dimensions to the typology and to change the typology to an arch, over sized or round shape.
 : it needs for join or divide two structures of a typology.
 : it needs to print the typology.
 : with this button you can open the Parts box to see or change parts of the typology (see Job Management).
 : it activates Display single node, for which see the chapter Node Definition Window.
 : shows the tool machinings on the profile, sent by the program to the machining center, where it is present. For further information on Opera CAM, please see the reference manual.
 : it needs to insertion in Worksheet of structures to be used to make the typology.
- File:Tastocancel2.png: with this button you can delete a structure of the typology. After pressing it will be necessary to simply click on the structure you want to delete. When finished it should be deactivated.
- File:Tastomodif.png: with this button you can edit a structure of the typology. After pressing it will be sufficient to click on the structure you want to edit and will be opened structure configuration framework whose contents and functioning are explained in the section concerning the button [File:tastoinser.png]]. The edit button is as a switch, so it must be turned off when finished.
 : is used to duplicate a structure already present on the Worksheet. After pressing it, the cursor takes the shape of a square and allows us to insert the copied structure from the corner of the typology already present in the Worksheet. To change the position of the structure to be inserted, it is necessary to operate on the OSNAP buttons, the function of which will be explained later in this chapter.
File:Foglioprogettazionedistanza.png
Subdivision parameters
 : it needs to multiply structures of a typology.
 : it needs to select a typology of an existing drawing on the WorkSheet.
 : it needs to switch the opening direction.
 : opens the panel to enter or edit the typology panes.
 : it opens a box when you can enter or change notes that allows to add notes to the scheme of the typology
 : it opens the box that allows you to manage frame cuts of curtain walls.
 : allows you to manually measure the distances of the typology drawn in the Worksheet. After selecting it, simply click a point on the typology with the mouse and drag it to the desired place. This picture will be shown where you can read the measure you are interested in and/or enter it within the typology.
Curtain Walls buttons
 : with this button you can entry lines and columns.
 : with this button you can marge selected mirrors.
 : it opens the panel that allows to enter data for frame cuts.
- File:Tas.tosolai.png]]: it opens the panel that allows to enter data for Floor position.
 : it opens the software that allows to edit the typology in .dxf
format.
Zoom buttons
Zoom or detail buttons are a very useful function: they allow the visual dimensions of the structure to be changed, or to focus on specific details of the structure. :Each press reduces the design by a certain percentage. It is useful to have more space in the WorkSheet.
 : zooms the drawing to take up all the available space in the Worksheet.
 : allows you to zoom in on a particular part of the drawing. After pressing it you will notice that the mouse pointer will take the shape of a cross: at this point you have to draw an area with the mouse around the area to be zoomed in and left-click when finished. The selected area will be zoomed in until it takes up all the available space in the design sheet.


