How to merge pane IDs by job
From Opera Wiki
(Difference between revisions)
Monica.Sanna (Talk | contribs) (→Job Management) |
Lyna.Ferhi (Talk | contribs) |
||
| Line 6: | Line 6: | ||
[[Image:Finestraparametrideltaglio2.png|thumb|500px|]] | [[Image:Finestraparametrideltaglio2.png|thumb|500px|]] | ||
| - | * Open ''Workshop > Cutting'' and enable | + | * Open ''Workshop > Cutting'' and enable the '''Enable cut grouping by job''' field. |
| - | * You will now see these new | + | * You will now see these new options in your jobs windows [[File:campicodiciid.png|400px]] |
{{BR}} | {{BR}} | ||
| Line 13: | Line 13: | ||
[[Image:finestraarchiviocommessecodiciID.png|thumb|500px|Job Archive]] | [[Image:finestraarchiviocommessecodiciID.png|thumb|500px|Job Archive]] | ||
| - | *Choose ID code format to merge fills with identical size. | + | *Choose the ID code format to merge the fills with identical size. |
[[File:codiciid.png|300px]] | [[File:codiciid.png|300px]] | ||
| - | *In the ''Job Management'' panel, through the ''Print Options,'' | + | *In the ''Job Management'' panel, print, through the ''Print Options,'' a '''Bill of Materials'''. |
{{BR}} | {{BR}} | ||
[[Image:stampariempimentiaccorpati.png|thumb|500px]] | [[Image:stampariempimentiaccorpati.png|thumb|500px]] | ||
| - | *In the printout the fills will be merged under the chosen code. In this case the code is %job_id%, which corresponds to the Progress | + | *In the printout, the fills will be merged under the chosen code. In this case, the code is %job_id%, which corresponds to the Job's Progress. The program assigns a numeric index to the merged cuts. |
| - | The No. | + | The No.of the column's pieces will show the number of the merged pieces; in the Ident. code column, the first number indicates the sequence of the job, the second is the numeric index assigned by the program. |
| - | *The summary of the cuts and assigned codes can be viewed in the '''Job Fills Management'''' panel, which opens upon pressing the [[Image:gestioneriempimenticommessa.png]] button in the [[Edit Jobs|jobs archive]] panel. | + | *The summary of the cuts and of the assigned codes can be also viewed in the '''Job Fills Management'''' panel, which opens upon pressing the [[Image:gestioneriempimenticommessa.png]] button in the [[Edit Jobs|jobs archive]] panel. |
[[File:Finestragestionedeiriempimenticommessa.png|400 px]] | [[File:Finestragestionedeiriempimenticommessa.png|400 px]] | ||
Latest revision as of 21:10, 26 June 2025
How to enable it
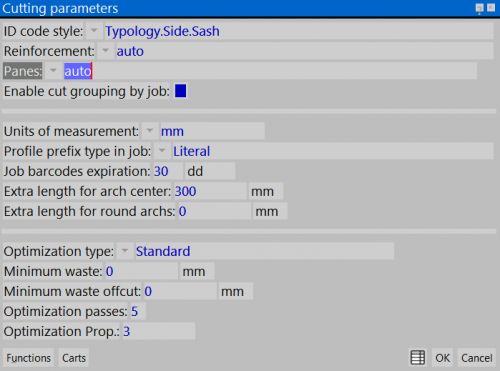
- Open Workshop > Cutting and enable the Enable cut grouping by job field.
- You will now see these new options in your jobs windows

Job Management
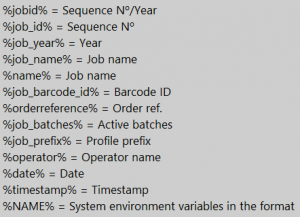
- Choose the ID code format to merge the fills with identical size.
- In the Job Management panel, print, through the Print Options, a Bill of Materials.
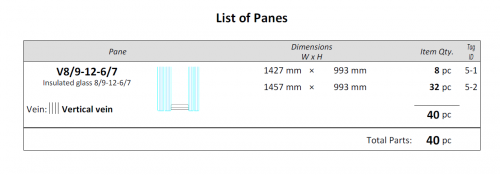
- In the printout, the fills will be merged under the chosen code. In this case, the code is %job_id%, which corresponds to the Job's Progress. The program assigns a numeric index to the merged cuts.
The No.of the column's pieces will show the number of the merged pieces; in the Ident. code column, the first number indicates the sequence of the job, the second is the numeric index assigned by the program.
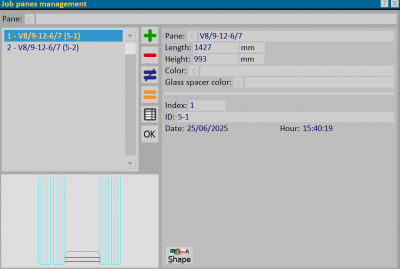
- The summary of the cuts and of the assigned codes can be also viewed in the Job Fills Management' panel, which opens upon pressing the
 button in the jobs archive panel.


