Labels
From Opera Wiki
(Difference between revisions)
| Line 49: | Line 49: | ||
**'''File''' [[image:tastomenutendina.png]] : the path of the file to insert into the label field | **'''File''' [[image:tastomenutendina.png]] : the path of the file to insert into the label field | ||
| - | + | ::{{NOTE|this field is enabled only when ''Image'' type is chosen}} | |
**'''Position''' [[image:tastomenutendina.png]] : this field is used to set where the program has to draw the profile’s position from, as if from the saw machine or the workcenter. A new field will be activated which allow to assign the machine the parameters refers to. | **'''Position''' [[image:tastomenutendina.png]] : this field is used to set where the program has to draw the profile’s position from, as if from the saw machine or the workcenter. A new field will be activated which allow to assign the machine the parameters refers to. | ||
| - | + | ::{{NOTE|this field is enabled only when ''Drawing'', ''Clamping'' or ''Item shape'' type is chosen}} | |
**'''Prints clamp''': if enabled, the clamp is displayed along with the profile shape}} | **'''Prints clamp''': if enabled, the clamp is displayed along with the profile shape}} | ||
| - | + | ::{{NOTE|this field is enabled only when ''Drawing'' type is chosen}} | |
**'''Color''' [[image:tastomenutendina.png]] : the structure part at which the color il related. | **'''Color''' [[image:tastomenutendina.png]] : the structure part at which the color il related. | ||
| - | + | ::{{NOTE|this field is enabled only when ''Color'' type is chosen}} | |
**'''Machining''' [[image:tastoc.png]] : opens the machining list. To make this label field work properly the user must specify the machining. | **'''Machining''' [[image:tastoc.png]] : opens the machining list. To make this label field work properly the user must specify the machining. | ||
| - | + | ::{{NOTE|this field is enabled only when ''Variable'' type is chosen}} | |
**'''Variable''' [[image:tastomenutendina.png]] : the variable of reference associated to the previous function. The user can even use this field in order to report other values not necessarily deriving from a specific machining, e.g. the lock height, taking the variable from the list opened by the button. | **'''Variable''' [[image:tastomenutendina.png]] : the variable of reference associated to the previous function. The user can even use this field in order to report other values not necessarily deriving from a specific machining, e.g. the lock height, taking the variable from the list opened by the button. | ||
| - | + | ::{{NOTE|this field is enabled only when ''Variable'' type is chosen}} | |
**'''UM''' [[image:tastomenutendina.png]] : the unit of measure with which must be reported the variable’s value | **'''UM''' [[image:tastomenutendina.png]] : the unit of measure with which must be reported the variable’s value | ||
| - | + | ::{{NOTE|this field is enabled only when ''Variable'' type is chosen}} | |
**'''No print 0''': the variable is not displayed if null. | **'''No print 0''': the variable is not displayed if null. | ||
| - | + | ::{{NOTE|this field is enabled only when ''Variable'' type is chosen}} | |
**'''Typology view type''' [[image:tastomenutendina.png]] : the way to display the typology within the label field | **'''Typology view type''' [[image:tastomenutendina.png]] : the way to display the typology within the label field | ||
| - | + | ::{{NOTE|this field is enabled only when ''Structure's profile view'' type is chosen}} | |
**'''Barcode lenght/format''' [[image:tastomenutendina.png]] : the barcode lenght and format to use | **'''Barcode lenght/format''' [[image:tastomenutendina.png]] : the barcode lenght and format to use | ||
| - | + | ::{{NOTE|this field is enabled only when ''Workpiece barcode'' type is chosen}} | |
**'''Workcenter barcode''': if enabled, allows to trasfer barcodes only for the pieces worked on the workcenter | **'''Workcenter barcode''': if enabled, allows to trasfer barcodes only for the pieces worked on the workcenter | ||
| - | + | ::{{NOTE|this field is enabled only when ''Item shape'', or ''Workpiece barcode'' type is chosen}} | |
**'''Field name''': the name of the extra field | **'''Field name''': the name of the extra field | ||
| - | + | ::{{NOTE|this field is enabled only when ''Additional job fields'', or ''Additional job line fields'' type is chosen}} | |
Revision as of 12:21, 24 June 2011
Content description
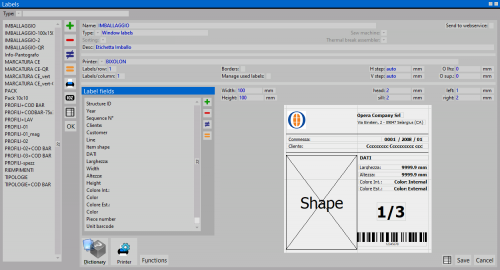
- Name : labels are usually printed out distinctly by profiles, panes, typologies. Hence in this field the user will set e code in order to distinguish the label.
- Type : the label type
- Arrangement : the printing order of the labels
- Desc : the label description
- Printer type : the default printer for the label
- Labels per row/column : the number of labels per page to print
- Borders : if enabled, label borders will be printer for the alignment
- Handle used labels : if enabled, the sheet management will ask the number of rows already used
- Step x/y : establishes the horizontal and the vertical step of each label, comprised the space amid the labels of the same row and column.
- O lt/top : the left and the top margin of the sheet
- Width/Height : the dimensions of the label
- Top/Sill/L jb/R jb : the margin of the informations printed out within the label.
 : the Profile selection for cutting has the function to establish at which profiles responding to a certain function the label has to be printed to. this button opens a list of Functions to activate in order to be considered for the label.
 : opens the Labeller settings
Label fields
Within this section the user customizes the label, adding the fields to display in the label.
 : deletes the selected label field from the list
 : edits the selected label field from the list
 : duplicates the selected label field from the list
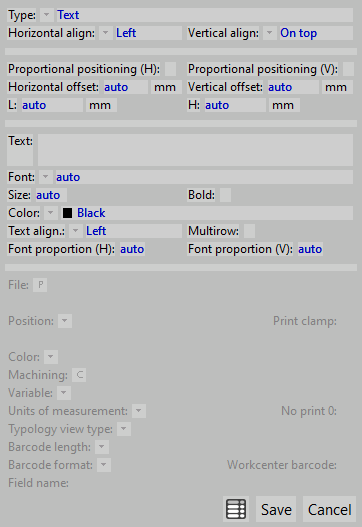
 : adds a new label field. clicking the button will open the window shown on the right. Every new added item has the following parameters:
Common fields
- Type [image:tastomenutendina.png]] : the content to add to the tables (e.g, Year,Ctoss-section,Order reference...)
- Horiz./Vertical align [image:tastomenutendina.png]] : the position of the field within the label area.
- Proportional hor./vert. pos.: these two fields are closely connected with the followings two. Their activation arranges the field contents according to the proportion of the label itself
- Horiz./Vertical offset: the horizontal and vertical shift from the label’s edges. If the fields of proportional setting are not enabled, then it is about to digit a value in mm., on the contrary the value is according the label’s proportion
- L/H: the width/height of the label field
- Text: a text to print in the custom field
- Font [image:tastomenutendina.png]] : the font to use to display the new field
- Size: the font size
- Bold: if enabled, the font text will be displayed in bold
- Color [image:tastomenutendina.png]] : the font color
- Text align [image:tastomenutendina.png]] : the text alignment
- Multirow: if enabled, allows to write more than one text row
- Proportion H/V: the font proportions
Specific fields
According to the chosen Type, these fields may be active or not.
 NOTE:
NOTE:
this field is enabled only when Image type is chosen
 NOTE:
NOTE:
this field is enabled only when Drawing, Clamping or Item shape type is chosen
- Prints clamp: if enabled, the clamp is displayed along with the profile shape}}
 NOTE:
NOTE:
this field is enabled only when Drawing type is chosen
 NOTE:
NOTE:
this field is enabled only when Color type is chosen
 NOTE:
NOTE:
this field is enabled only when Variable type is chosen
 NOTE:
NOTE:
this field is enabled only when Variable type is chosen
 NOTE:
NOTE:
this field is enabled only when Variable type is chosen
- No print 0: the variable is not displayed if null.
 NOTE:
NOTE:
this field is enabled only when Variable type is chosen
 NOTE:
NOTE:
this field is enabled only when Structure's profile view type is chosen
 NOTE:
NOTE:
this field is enabled only when Workpiece barcode type is chosen
- Workcenter barcode: if enabled, allows to trasfer barcodes only for the pieces worked on the workcenter
 NOTE:
NOTE:
this field is enabled only when Item shape, or Workpiece barcode type is chosen
- Field name: the name of the extra field
 NOTE:
NOTE:
this field is enabled only when Additional job fields, or Additional job line fields type is chosen


