Additional job fields
From Opera Wiki
(Difference between revisions)
| Line 23: | Line 23: | ||
*'''Distance''': the distance between the field and the previous one. | *'''Distance''': the distance between the field and the previous one. | ||
*'''File''' [[File:tastop.png]]: allows loading a file that contains the field value. | *'''File''' [[File:tastop.png]]: allows loading a file that contains the field value. | ||
| - | {{NOTE| Creating a field for the sale agent or the payment type requires to choose the current value time by time from a list. | + | {{NOTE| Creating a field for the sale agent or the payment type requires to choose the current value time by time from a list. Creating a text file with the possibile values and linking its path to the field will create a item list of values for the field within the Job}} |
| - | + | *'''Query''' [[File:tastop.png]]: This function is very useful for those who use to flank Opera with outer programs able to receive XML format files. Basically is about to identify the linking path with that part of the program which will open in the field a possible list of a parameter to report in the field itself, alike the previous ''File'' field. | |
| - | + | ||
| - | *'''Query''' [[File:tastop.png]]: | + | |
{{BR}} | {{BR}} | ||
Revision as of 13:00, 6 June 2011
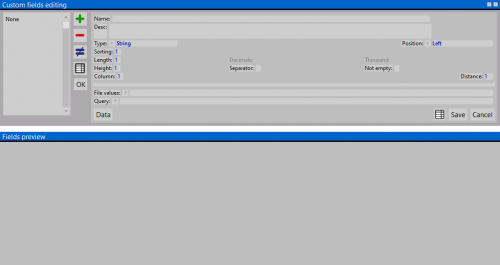
This windows allowa the user to add multiple custom fields to the Job details. Every field will be
'Content description
- Name/ Description: the name and description of the custom field.
- Type
 : the field type (String,Number,Text,Date,Hour,String,True/False,File)
- Position
 : the field position within the job screen and the job line.
- Arrangement: the displaying order of the field in the job screen.
 NOTE:
NOTE:
This value is automatically generated, but its value is editable
- Lenght / Height: the custom field dimensions. These fields will be enabled according to the selected Type value.
- Column: the column on which the field will be placed in the job window.
- Decimals: the number of decimals to use.
 NOTE:
NOTE:
This value is enabled only for type Number format
- Thousand: if enabled, shows the thousand separator symbol.
 NOTE:
NOTE:
This value is enabled only for type Number format
- Separator: if enabled, add a separator line after the field
- Distance: the distance between the field and the previous one.
- File
 : allows loading a file that contains the field value.
Creating a field for the sale agent or the payment type requires to choose the current value time by time from a list. Creating a text file with the possibile values and linking its path to the field will create a item list of values for the field within the Job
- Query
 : This function is very useful for those who use to flank Opera with outer programs able to receive XML format files. Basically is about to identify the linking path with that part of the program which will open in the field a possible list of a parameter to report in the field itself, alike the previous File field.
La stampa
File:Quadroopzionidistampa.png
Le opzioni di stampa
Molte delle informazioni generate dai campi extra commessa possono essere riportati su stampa. All’interno della Gestione della Commessa premiamo il pulsante  e apriamo il quadro Opzioni di stampa.
Di seguito le opzioni più rilevanti per i campi extra commesse:
- Modulo tipologie #1 / #2 / #3: Le tre denominazioni del Modulo tipologie esistono nel programma poiché ognuna di esse produce una stampa con delle caratteristiche leggermente diverse tra loro. Il Modulo #1 riporta in stampa la tipologia unitamente ai nodi in scala. Viceversa il Modulo #2 riporta in stampa la tipologia con i nodi riproporzionati alle dimensioni della struttura nello schema. Infine il Modulo #3 riporta la tipologia in stampa priva dei nodi.
- Tipo scala: Il parametro prescelto da questa lista determina il tipo di scala adottata dal programma per la stampa del modulo tipologia.
- Righe / Colonne: I valori riportati in queste caselle hanno la funzione di dividere per righe e colonne il modulo tipologia.
File:Finestragestionedatimodulo.png
Il quadro di gestione dati modulo
- File:Datimodulo.png: La pressione di questo pulsante apre il quadro Gestione dati del modulo: al Modulo tipologie che ha un contenuto di informazioni gestito dal programma, è possibile aggiungerne altre, personalizzando il modulo stesso in funzione dell’esigenza.
Il pulsante abbinato apre la lista dei campi che è possibile aggiungere alla stampa del modulo. In questa lista verranno riportati anche i campi creati dall’utente.
- Posizione: Il valore riportato determina la posizione del campo nella stampa del modulo.
- Colore titolo
 : Apre un elenco di colori da abbinare al titolo del campo nella stampa.
- Proporzione caratteri: Determina la proporzione dei caratteri dei titoli dei campi, in percentuale rispetto al valore standard.
- Colore valore
 : Il pulsante abbinato apre l’elenco dei colori da abbinare al valore del campo riportato nella stampa del modulo.
- Grassetto: Determina le caratteristiche del carattere di stampa nel modulo.
File:Modulotipologia.png
Esempio di stampa modulo tipologia #1


