Icon edit
From Opera Wiki
(Difference between revisions)
| Line 17: | Line 17: | ||
*'''Size''': the image file size. This field is calculated by Opera. | *'''Size''': the image file size. This field is calculated by Opera. | ||
*'''Icon format''': the color depth to use for the image. | *'''Icon format''': the color depth to use for the image. | ||
| - | {{NB|this field is available only for Image formats (BMP, TIF, JPG, PNG}} | + | :{{NB|this field is available only for Image formats (BMP, TIF, JPG, PNG}} |
*'''Trasparency''' [[File:frecciagiu.png]]: this is used to set the transparency level of the image background. | *'''Trasparency''' [[File:frecciagiu.png]]: this is used to set the transparency level of the image background. | ||
| Line 27: | Line 27: | ||
*[[File:tastodimensione.png]]: allows to change the dimensions of the image or drawing, by opening the Object Data field | *[[File:tastodimensione.png]]: allows to change the dimensions of the image or drawing, by opening the Object Data field | ||
*[[File:tastofiltro.png]]: optimizes the overall picture quality | *[[File:tastofiltro.png]]: optimizes the overall picture quality | ||
| - | {{NB|this field is available only for WMF or DXF sections }} | + | :{{NB|this field is available only for WMF or DXF sections }} |
*[[File:tastocomponi.png]]: allows to build the profile section. Pressing it the program introduce in the Edit profile Cross-section, where is possible to import further images, in order to create the profile icon. The way of use this editor is the same of the Edit profile Cross-section in the [[Node definition|Nodes]]. | *[[File:tastocomponi.png]]: allows to build the profile section. Pressing it the program introduce in the Edit profile Cross-section, where is possible to import further images, in order to create the profile icon. The way of use this editor is the same of the Edit profile Cross-section in the [[Node definition|Nodes]]. | ||
Revision as of 14:49, 17 May 2011
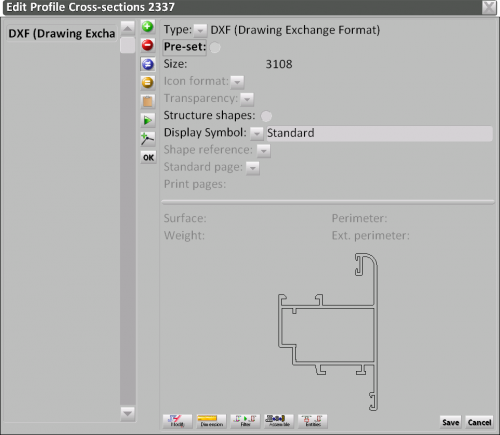
This window allows to create or modify the sectional drawing of the profile. Opera will also allow you to link every profile to its graphic section as indicated in the catalogue. This could be an image taken directly from the catalogue using a scanner or it could be manually drawn by the user.
Content description
 : When handling this section, it is possible to save many images or drawings. When this button is pressed with an image selected, the Preset field is activated. This means that the selected image will be shown in the profiles preview window. Basically, this provides the possibility of handling a set of images or drawings of the profile.
- Type: the drawing type
- Size: the image file size. This field is calculated by Opera.
- Icon format: the color depth to use for the image.
 N.B: this field is available only for Image formats (BMP, TIF, JPG, PNG
- Trasparency
 : this is used to set the transparency level of the image background.
- Structure shapes: if enabled, Opera will consider a unique piece as the structure’s shape
- Display symbol
 : Opera allows to insert multiple images for the same profile; this button display a list, from which the users can choose the picture displaying type, namely its possible to have the picture in such position that has to be shown in the cutting list, or for those who use Opera Machining, in the related prints of the workcenter.
 : allows you to edit the image, by connecting to the graphics program, or to the small matrix editor
 : allows to change the dimensions of the image or drawing, by opening the Object Data field
 : optimizes the overall picture quality
 N.B: this field is available only for WMF or DXF sections
 : allows to build the profile section. Pressing it the program introduce in the Edit profile Cross-section, where is possible to import further images, in order to create the profile icon. The way of use this editor is the same of the Edit profile Cross-section in the Nodes.
 : open DXF entities editor for managing lines and polylines of the dxf or dwg drawing.


