How to merge pane IDs by job
From Opera Wiki
(Difference between revisions)
Monica.Sanna (Talk | contribs) |
Monica.Sanna (Talk | contribs) (→Job Management) |
||
| (8 intermediate revisions not shown) | |||
| Line 1: | Line 1: | ||
| + | {{NB|This feature is dedicated to users working with Curtain Walls (optional)}}. | ||
| - | |||
| - | + | == How to enable it == | |
| - | == | + | |
[[Image:Finestraparametrideltaglio2.png|thumb|500px|]] | [[Image:Finestraparametrideltaglio2.png|thumb|500px|]] | ||
| - | * | + | * Open ''Workshop > Cutting'' and enable field '''enable cut grouping by job''' |
| - | * | + | * You will now see these new fields in your jobs [[File:campicodiciid.png|400px]] |
{{BR}} | {{BR}} | ||
| - | == Management | + | == Job Management == |
| - | [[Image:finestraarchiviocommessecodiciID.png|thumb|500px| | + | [[Image:finestraarchiviocommessecodiciID.png|thumb|500px|Job Archive]] |
*Choose ID code format to merge fills with identical size. | *Choose ID code format to merge fills with identical size. | ||
[[File:codiciid.png|300px]] | [[File:codiciid.png|300px]] | ||
| - | *In the ''Job Management'' panel, through the ''Print Options,'' print, for example, a '''Bill of | + | *In the ''Job Management'' panel, through the ''Print Options,'' print, for example, a '''Bill of Materials'''. |
{{BR}} | {{BR}} | ||
| Line 26: | Line 25: | ||
The No. pieces column will show the number of pieces merged; in the Ident. code column, the first number indicates the sequence of the job, the second is the numeric index assigned by the program. | The No. pieces column will show the number of pieces merged; in the Ident. code column, the first number indicates the sequence of the job, the second is the numeric index assigned by the program. | ||
| - | *The summary of the cuts and assigned codes can be viewed in the '''Job Fills Management'''' panel, which opens upon pressing the [[Image: | + | *The summary of the cuts and assigned codes can be viewed in the '''Job Fills Management'''' panel, which opens upon pressing the [[Image:gestioneriempimenticommessa.png]] button in the [[Edit Jobs|jobs archive]] panel. |
[[File:Finestragestionedeiriempimenticommessa.png|400 px]] | [[File:Finestragestionedeiriempimenticommessa.png|400 px]] | ||
Latest revision as of 15:11, 24 June 2025
How to enable it
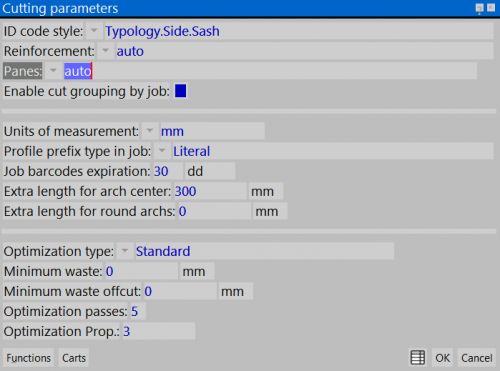
- Open Workshop > Cutting and enable field enable cut grouping by job
- You will now see these new fields in your jobs

Job Management
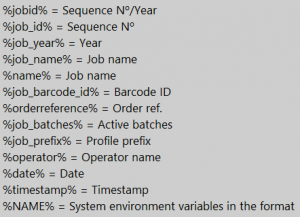
- Choose ID code format to merge fills with identical size.
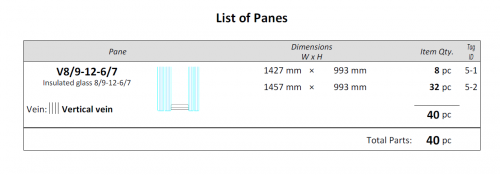
- In the Job Management panel, through the Print Options, print, for example, a Bill of Materials.
- In the printout the fills will be merged under the chosen code. In this case the code is %job_id%, which corresponds to the Progress of the job. The program assigns a numeric index to the merged cuts.
The No. pieces column will show the number of pieces merged; in the Ident. code column, the first number indicates the sequence of the job, the second is the numeric index assigned by the program.
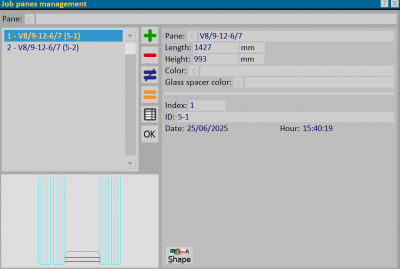
- The summary of the cuts and assigned codes can be viewed in the Job Fills Management' panel, which opens upon pressing the
 button in the jobs archive panel.


