How to create a new pane
From Opera Wiki
Monica.Sanna (Talk | contribs) (→Price management for double-glazing) |
Monica.Sanna (Talk | contribs) (→How to manage the field Price type) |
||
| (20 intermediate revisions not shown) | |||
| Line 14: | Line 14: | ||
# Set the function (Pane). | # Set the function (Pane). | ||
| - | At this stage it’s important to define the thickness of the | + | At this stage it’s important to define the thickness of the pane and the field Surface when necessary (this field allows calculation in square metres by considering multiples). |
In the case of a panel, define its size using the Width and Height fields. | In the case of a panel, define its size using the Width and Height fields. | ||
| Line 29: | Line 29: | ||
We can create several layers in this box: | We can create several layers in this box: | ||
| - | *''Name''': This is the name of the | + | *'''Name''': This is the name of the pane to be applied |
| - | *'''Position''': Is the position for correct identification of the | + | *'''Position''': Is the position for correct identification of the color |
**'''Auto''': Uses the normal fill colour field | **'''Auto''': Uses the normal fill colour field | ||
| - | **'''Internal''': defines the | + | **'''Internal''': defines the color from the profiles internal colour field |
| - | **'''External''': defines the | + | **'''External''': defines the color from the outer color field of the profiles |
| - | **'''Int-East''': defines the | + | **'''Int-East''': defines the color from the inner and outer color fields of the contours, applying a two-tone if present |
| - | **'''None''': does not apply any | + | **'''None''': does not apply any color |
| - | *''' | + | *'''Perpendicular diff.''': Allows you to specify a cut difference if the fills are not aligned (see example). |
| Line 43: | Line 43: | ||
== How to Assign Prices == | == How to Assign Prices == | ||
| - | Before we look at price assignment, it’s important to know that there are three different price entry conditions that vary according to the '' | + | Before we look at price assignment, it’s important to know that there are three different price entry conditions that vary according to the ''Functione Pane'' field: |
| - | *'''Single glass''' and '''Panel''': these | + | *'''Single glass''' and '''Panel''': these pane types allow you to manage a single color, '''Pane color''' for the glass and '''Panels color''' for the panel. |
| - | *''' | + | *'''Double glass''': this type of pane allows you to manage prices according to both the color of the pane (Satin, Opaque...) and the color of the glass spacer (Silver, Black, Bronze...) with the headings '''Pane color''' and '''Glass spacer color''' |
| - | *''' | + | *'''Bicolor panel''': this type allows you to specify for a single panel, both the internal and the external colour with the entries '''Internal colour''' and '''External colour'''. |
| - | The price screen then varies according to the type of filling we select. To assign prices, open the Accessory | + | The price screen then varies according to the type of filling we select. To assign prices, open the Accessory archive screen by selecting Accessories from the menu: |
Select the button [[Image:tastodiverso.png]] to enter the accessory and then select [[Image:tastoprezzi4.png]]; in the following frame click [[Image:tastopiu.png]] to enter the data. | Select the button [[Image:tastodiverso.png]] to enter the accessory and then select [[Image:tastoprezzi4.png]]; in the following frame click [[Image:tastopiu.png]] to enter the data. | ||
| - | Prices can be managed without any | + | Prices can be managed without any coloring if the item has a single price, or they can be managed by coloring, which as explained above can vary according to ''Pane type''. |
{{BR}} | {{BR}} | ||
=== Price management for single pane or panel === | === Price management for single pane or panel === | ||
| - | [[Image: | + | [[Image:accessoriesprize.png|500px|thumb|right]] |
| - | Determine the ''' | + | Determine the '''Coloring''' when required. |
Enter the price and, if necessary, enter the discount percentage. | Enter the price and, if necessary, enter the discount percentage. | ||
| Line 67: | Line 67: | ||
If you want to enter other prices for other colours repeat the operation, otherwise press [[Image:ok.png]] to exit the picture. | If you want to enter other prices for other colours repeat the operation, otherwise press [[Image:ok.png]] to exit the picture. | ||
{| | {| | ||
| - | |[[File: | + | |[[File:generalinfotype2.png|thumb|500px|General info type, with pane colour for glass and panel color for panel]] |
|} | |} | ||
{{BR}} | {{BR}} | ||
| - | === Price management for double- | + | === Price management for double-glass === |
| - | [[Image: | + | [[Image:pricesglass.png|500px|thumb|right]] |
| - | Having determined the ''' | + | Having determined the '''Coloring''' when required, it’s also possible in this case to specify a possible difference based on the '''Glass spacer''', in which case the price will be chosen based on the correct coloring set in the type. |
| Line 81: | Line 81: | ||
You can now save by pressing [[Image:ok.png]] . | You can now save by pressing [[Image:ok.png]] . | ||
| - | If you want to enter other prices for other | + | If you want to enter other prices for other color combinations repeat the operation, otherwise press [[Image:ok.png]] to exit the framework. |
{| | {| | ||
| - | |[[File: | + | |[[File:generalinfotype.png|thumb|500px|General info type, with pane colour for glass and glass spacer]] |
| + | |} | ||
| + | {{BR}} | ||
| + | === Price management for bicolor panel === | ||
| + | [[Image:pricespanel.png|500px|thumb|right]] | ||
| + | |||
| + | In the case of the bicolour panel, the screen will present two distinct items, in which to enter the '''Internal colour''' and the '''External colour''' so that the price is chosen based on the correct color set in the typology . | ||
| + | |||
| + | Enter the price and, if applicable, enter the discount percentage. | ||
| + | |||
| + | You can now save by pressing [[Image:ok.png]] . | ||
| + | |||
| + | If you want to enter other prices for other color combinations repeat the operation, otherwise press [[Image:ok.png]] to exit the framework. | ||
| + | |||
| + | {| | ||
| + | |[[File:generalinfotype3.png|thumb|500px|General info type, with bicolour pane]] | ||
| + | |} | ||
{{BR}} | {{BR}} | ||
| Line 91: | Line 107: | ||
In all different settings there is a field called '''Price type'''. The fields in the drop-down menu allow you to: | In all different settings there is a field called '''Price type'''. The fields in the drop-down menu allow you to: | ||
*'''Standard''': specify the price according to its unit, usually in square metres. | *'''Standard''': specify the price according to its unit, usually in square metres. | ||
| - | *'''Perimeter''': specify a price per ''linear metre'' calculated on the perimeter of the fill. In this case, the price must be entered WITHOUT | + | *'''Perimeter''': specify a price per ''linear metre'' calculated on the perimeter of the fill. In this case, the price must be entered WITHOUT coloring. |
*'''Panel'''': specify a price per '''piece'''. This type of price is useful when buying glass panes and not the finished panel. In this way, both the price and the order will show the glass pane according to the dimensions previously entered in the ''Width'' and ''Height'' fields of the filling. | *'''Panel'''': specify a price per '''piece'''. This type of price is useful when buying glass panes and not the finished panel. In this way, both the price and the order will show the glass pane according to the dimensions previously entered in the ''Width'' and ''Height'' fields of the filling. | ||
Latest revision as of 13:31, 6 March 2024
Remember that to learn more about the contents, the function of the buttons and boxes you can see in Section 1, chapter The Accessories Archive, paragraph Description of the contents of the accessories archive.
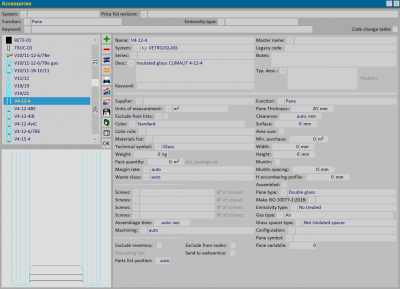
- Click the
 button to start.
- Enter the code name.
- Determine the system and series to which it belongs.
- Describe the characteristics.
- Determine the unit of measurement (square metres)
- Set the technical symbol (Glass or Panel)
- Set the function (Pane).
At this stage it’s important to define the thickness of the pane and the field Surface when necessary (this field allows calculation in square metres by considering multiples).
In the case of a panel, define its size using the Width and Height fields.
Define the pane type and the following fields for the normative calculation.
The accessory has now been created, confirm by clicking ![]() and
and ![]() until you return to the Opera menu bar.
until you return to the Opera menu bar.
Contents |
Assembled pane
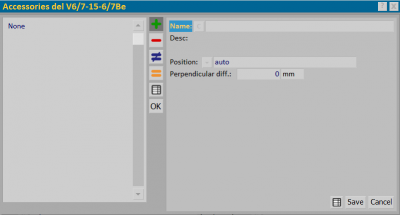
In the case of some panes or glasses, it’s possible to create compositions or layers. In this case activate the flag on the field Assembled, so that the ![]() is activated.
is activated.
We can create several layers in this box:
- Name: This is the name of the pane to be applied
- Position: Is the position for correct identification of the color
- Auto: Uses the normal fill colour field
- Internal: defines the color from the profiles internal colour field
- External: defines the color from the outer color field of the profiles
- Int-East: defines the color from the inner and outer color fields of the contours, applying a two-tone if present
- None: does not apply any color
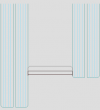
- Perpendicular diff.: Allows you to specify a cut difference if the fills are not aligned (see example).
How to Assign Prices
Before we look at price assignment, it’s important to know that there are three different price entry conditions that vary according to the Functione Pane field:
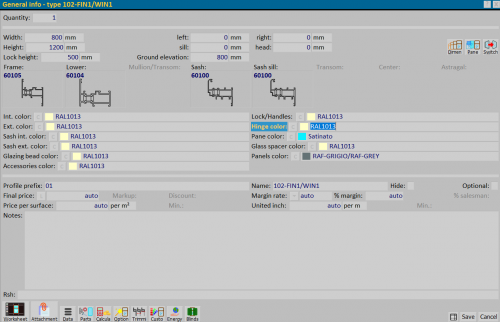
- Single glass and Panel: these pane types allow you to manage a single color, Pane color for the glass and Panels color for the panel.
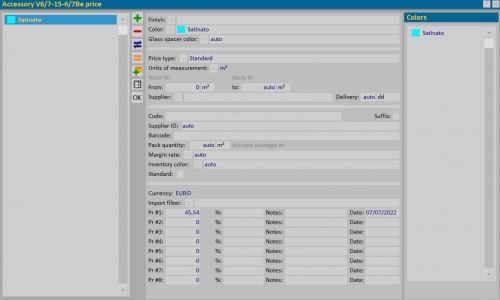
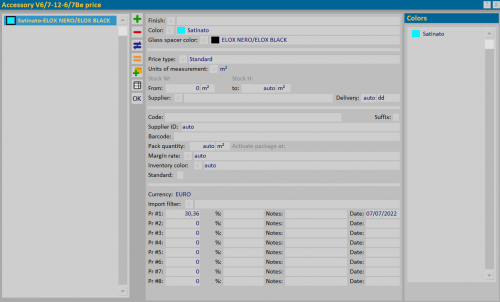
- Double glass: this type of pane allows you to manage prices according to both the color of the pane (Satin, Opaque...) and the color of the glass spacer (Silver, Black, Bronze...) with the headings Pane color and Glass spacer color
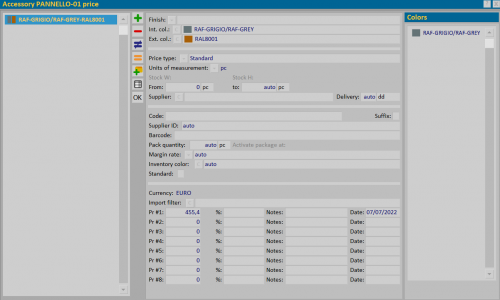
- Bicolor panel: this type allows you to specify for a single panel, both the internal and the external colour with the entries Internal colour and External colour.
The price screen then varies according to the type of filling we select. To assign prices, open the Accessory archive screen by selecting Accessories from the menu:
Select the button ![]() to enter the accessory and then select
to enter the accessory and then select ![]() ; in the following frame click
; in the following frame click ![]() to enter the data.
to enter the data.
Prices can be managed without any coloring if the item has a single price, or they can be managed by coloring, which as explained above can vary according to Pane type.
Price management for single pane or panel
Determine the Coloring when required.
Enter the price and, if necessary, enter the discount percentage.
You can now register by pressing on ![]() .
.
If you want to enter other prices for other colours repeat the operation, otherwise press ![]() to exit the picture.
to exit the picture.
Price management for double-glass
Having determined the Coloring when required, it’s also possible in this case to specify a possible difference based on the Glass spacer, in which case the price will be chosen based on the correct coloring set in the type.
Enter the price and, if applicable, enter the discount percentage.
You can now save by pressing ![]() .
.
If you want to enter other prices for other color combinations repeat the operation, otherwise press ![]() to exit the framework.
to exit the framework.
Price management for bicolor panel
In the case of the bicolour panel, the screen will present two distinct items, in which to enter the Internal colour and the External colour so that the price is chosen based on the correct color set in the typology .
Enter the price and, if applicable, enter the discount percentage.
You can now save by pressing ![]() .
.
If you want to enter other prices for other color combinations repeat the operation, otherwise press ![]() to exit the framework.
to exit the framework.
How to manage the field Price type
In all different settings there is a field called Price type. The fields in the drop-down menu allow you to:
- Standard: specify the price according to its unit, usually in square metres.
- Perimeter: specify a price per linear metre calculated on the perimeter of the fill. In this case, the price must be entered WITHOUT coloring.
- Panel': specify a price per piece. This type of price is useful when buying glass panes and not the finished panel. In this way, both the price and the order will show the glass pane according to the dimensions previously entered in the Width and Height fields of the filling.
