Job reports management
From Opera Wiki
(Difference between revisions)
Monica.Sanna (Talk | contribs) |
Monica.Sanna (Talk | contribs) |
||
| (12 intermediate revisions not shown) | |||
| Line 1: | Line 1: | ||
| - | |||
| - | |||
| - | |||
| - | |||
| - | |||
| - | |||
| - | |||
| - | |||
| - | |||
| - | |||
| - | |||
| - | |||
[[File:Opzionidistampa_.png|thumb|500px]] | [[File:Opzionidistampa_.png|thumb|500px]] | ||
| - | {{NB|To create a ''Job | + | {{NB|To create a ''Job report'' press the button [[File:tastoschede.png]], open the box ''Printing options''}} |
| - | The ''Job | + | The ''Job report'' allows to group different typologies of documents, which will come with a single operation and with the established order of printing. |
Below are the steps to follow: | Below are the steps to follow: | ||
*Select the prints that interest us. | *Select the prints that interest us. | ||
| - | *Press the [[File:+.png]] button at the top to open the ''Job | + | *Press the [[File:+.png]] button at the top to open the ''Job reports management'' panel. |
| - | *The '' | + | *The ''Job report prints'' section shows the selected files: |
**define the position of prints with arrows [[File:frecce.png]] | **define the position of prints with arrows [[File:frecce.png]] | ||
**assign a name to the file and save. | **assign a name to the file and save. | ||
| - | *In the '' | + | *In the ''Printing Options'' panel, select the newly created file and print it. |
[[File:fascicolo4.png|left|thumb|500px]] | [[File:fascicolo4.png|left|thumb|500px]] | ||
[[File:fascicolo3.png|thumb|500px]]. | [[File:fascicolo3.png|thumb|500px]]. | ||
| + | |||
| + | |||
| + | |||
| + | |||
If more than one file has to be created, the operations described above must be repeated. | If more than one file has to be created, the operations described above must be repeated. | ||
From the ninth file, the program will group them and display a drop-down menu with all created files. | From the ninth file, the program will group them and display a drop-down menu with all created files. | ||
| - | [[File:fascicolomenu.png|thumb|left|500px] | + | [[File:fascicolomenu.png|thumb|left|500px]] |
| + | |||
| + | |||
| + | |||
| + | |||
| + | |||
| + | |||
| + | |||
| + | |||
| + | |||
| + | |||
| + | |||
| + | |||
| + | |||
| + | |||
| - | *Save attachment: if the field is active, saves the document among the job's attachments | + | *''Save attachment'': if the field is active, saves the document among the job's attachments |
Latest revision as of 10:09, 5 March 2024
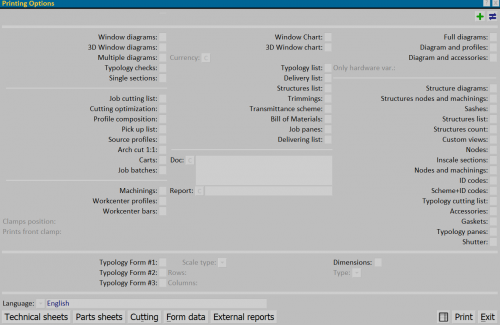
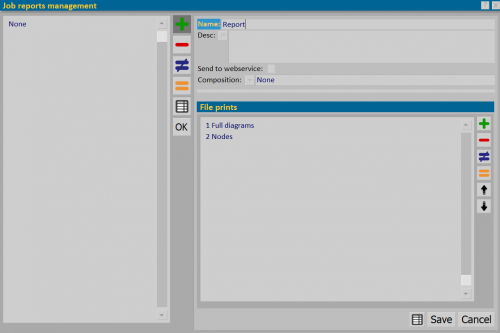
The Job report allows to group different typologies of documents, which will come with a single operation and with the established order of printing.
Below are the steps to follow:
- Select the prints that interest us.
- Press the
 button at the top to open the Job reports management panel.
- The Job report prints section shows the selected files:
- In the Printing Options panel, select the newly created file and print it.
If more than one file has to be created, the operations described above must be repeated.
From the ninth file, the program will group them and display a drop-down menu with all created files.
- Save attachment: if the field is active, saves the document among the job's attachments


